
Here’s a rundown on some of the best AirPod tips and hacks to make the most out of your listening device.
Apple AirPods are undeniably some of the most iconic and most popular tech pieces in this generation. Ever since their release in 2016, the AirPods have seen overwhelming success and have been leading the way for the wireless earbuds.
In 2019, it was estimated that around 60 million pairs of the AirPods were sold and that even increased to more than 100 million in 2020. That’s how many people are using AirPods right now.
The AirPods are known for their great build quality and all-around performance – they simply are the golden standards of wireless earbuds. But, a lot of people fail to realize that the AirPods were built to be more than just a pair of devices to help you listen to music.

If you’re one of their 100+ million users, there’s a chance you might be missing out on some surprising and nifty AirPods hacks that would make your life easier.
With that, today, we’ll be doing a rundown on some of the most helpful tips and tricks to make sure that you make the most out of your AirPods.
In This Article
- Customize Your Double-Tap Commands
- Hacks to NOT Lose Your AirPods
- Save Battery by Using Just One AirPod
- Share AirPods With a Friend or a Loved One
- AirPod Max Battery Saving Hack
- Make the Most Out of Siri
- Prolong Your AirPods’ Lifespan by Regular Cleaning
- Use AirPods as Hearing Assistant
- Hate Silicon? Change Your AirPod Tips to Memory Foam
- Use Your Airpods with Non-Apple Devices
- Conclusion
Customize Your Double-Tap Commands
One of the easiest and most useful changes you can do with your AirPods is to customize the double-tap feature. This can be done simply through the settings and, although the options you can change to are limited, they are still useful.
Originally, the AirPods would come out of the box with the double-tap function set to trigger Siri. Being an intelligent virtual assistant, Siri can do multiple tasks such as calling, messaging, opening, apps, and more. You can even ask Siri to control your music – play, pause, change the volume, or change the song.
While Siri is useful, you can change the double-tap function to play or pause your audio content, skip to the next track, or go back to the previous track. The best thing is, the left and right AirPods can be set to different commands.
With this, you’ll be able to navigate your phone remotely to an extent. This is especially helpful when you cannot access your phone readily, such as when you are jogging outside or working out.
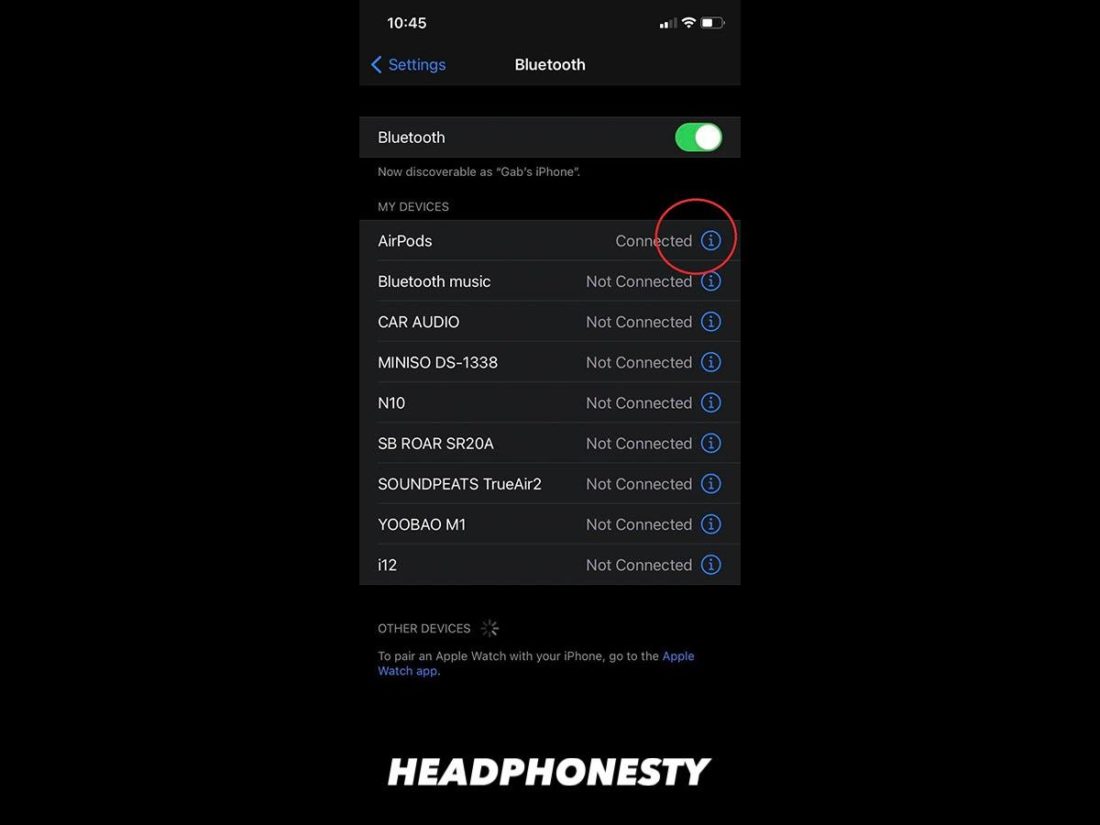
Here’s how you can change the double-tap commands:
- Go to Settings and click Bluetooth.

iPhone settings - Click the “i” icon beside your AirPods’ name
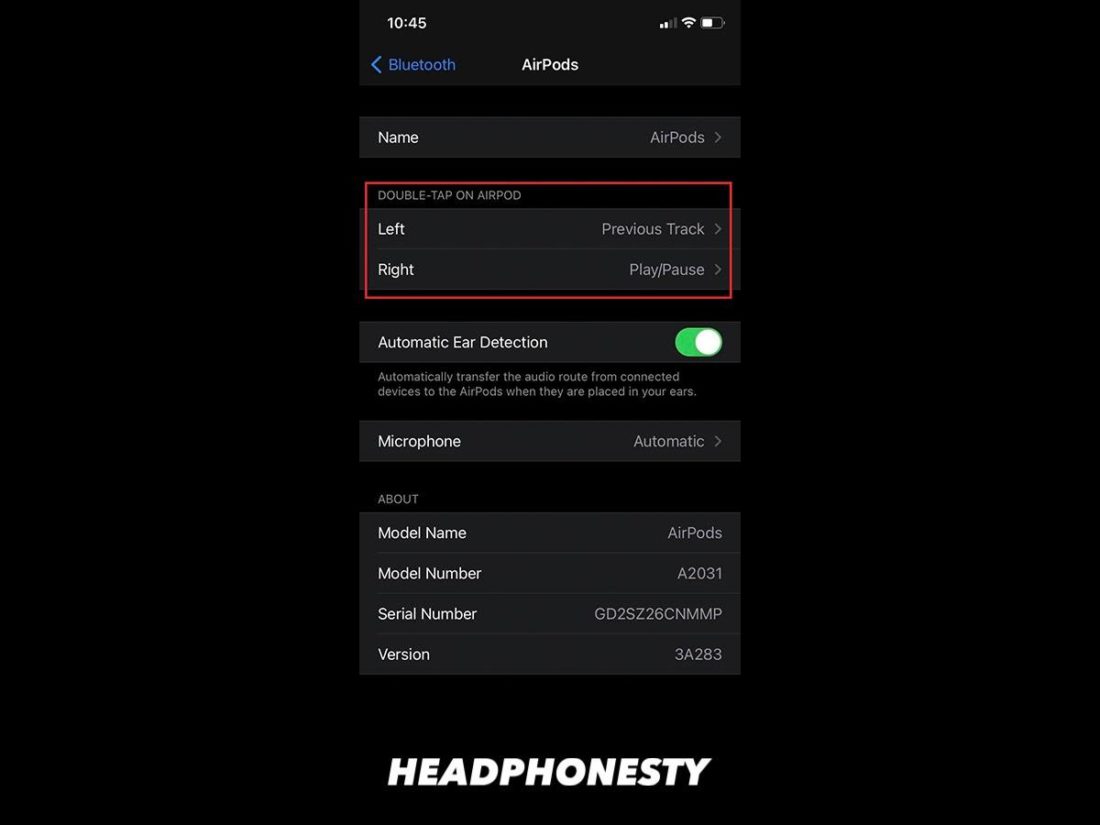
Advanced Options for AirPods - Assign a new command to each of your AirPods.
Edit left and right AirPods commands

Hacks to NOT Lose Your AirPods
Losing your AirPods even for a moment has to be one of the worst feelings in the world – and this is something most users experience. With their size, the AirPods aren’t exactly the easiest to find and, with their price, they also aren’t the easiest to give up on when lost.
To prevent this from happening, there are two things you can do. The first is to register your AirPods to Find My right away. The second thing is to rename your AirPods.
Let’s dive into the details!
Using “Find My” App
The Find My app is a mobile application released by Apple in 2019. The app tracks any of your Apple devices such as iPhones, Apple Watches, and items with an AirTag attached to them. Not a lot of people know that this app can also lead users to their lost AirPods.
Find My can only track items that are registered to the app or your iCloud account. So, before anything else, be sure that your AirPods are registered to the service already.
Fortunately, as long as you are logged in to your iCloud account on your iPhone when you first pair your AirPods, Find My will be set up automatically for you. The app is built-in on your iPhone, and you can also access your devices’ locations through the Find My website.

Rename the AirPods
Renaming your AirPods makes it more personalized. Interestingly enough, you could actually also use this feature to prevent your AirPods from getting totally lost.
Unlike devices with screens like your iPhone or your Mac, your AirPods won’t be able to display a message with your name and contact details. Also, we mentioned that if you misplaced your AirPods offline in transit, the Find My App wouldn’t be of much help to you anymore.
This is where renaming your AirPods can get handy. If you rename your AirPods to something that has your name and contact number, people who end up finding and opening your AirPods would know how to reach you. For example, you can rename your AirPods to “If you find this device, please contact (Name and Contact Number).”
To rename your AirPods, simply head on to Settings > Bluetooth and then tap the “i” icon beside your AirPods, where you’ll be able to access the naming feature.

Save Battery by Using Just One AirPod
Another tip is to use just one AirPod if you want to save your battery. The AirPods were designed by Apple to support stereo and mono mode, so you wouldn’t have to worry about the audio quality even when using just one AirPod.
The key here is the AirPods’ ability to support both stereo and mono audio.
Here’s a quick guide on how to activate mono audio:
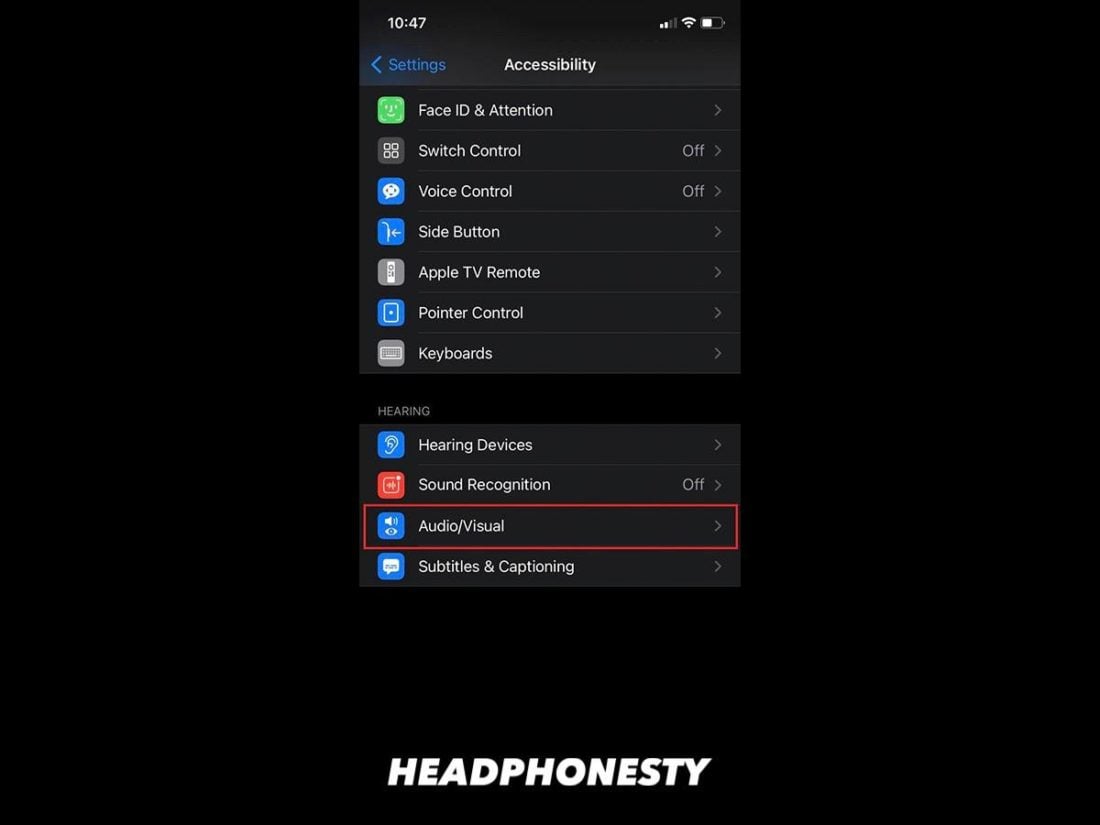
- Head to Settings > General > Accessibility > Audio/Visual.
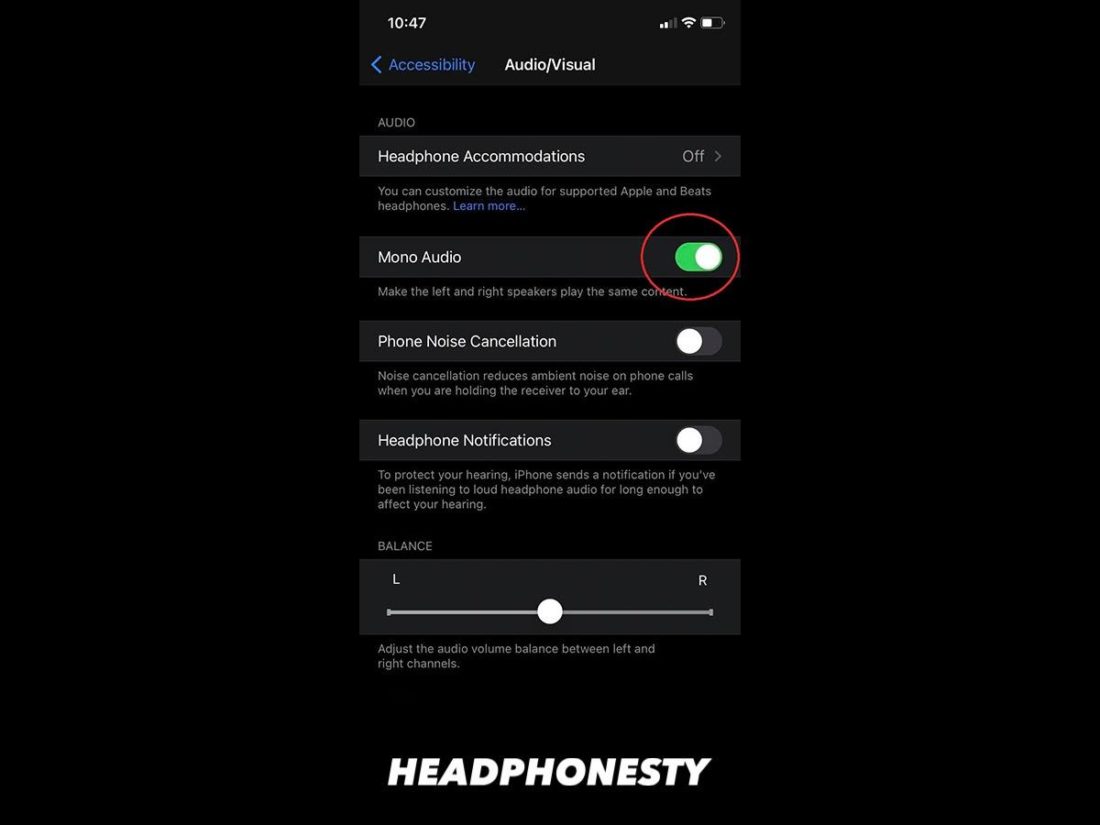
Going to Audio/Visual settings - Scroll down to Mono Audio and turn it on by ticking it.
Enabling Mono Audio
If you’re going on extremely long trips and you’re trying to stretch your battery life up to its last drop, this can be a life-saver. This tip isn’t just useful for travelers but also for day-to-day users who tend to forget to charge their AirPods. So, the next time your AirPods’ battery tries to ditch you in transit, simply pop one of the AirPods back in its case for later.
Share AirPods With a Friend or a Loved One
Apart from letting you prolong your AirPods’ battery life, mono audio also allows you to share what you hear through your AirPods.
Case in point, if you’re with a friend trying to reach out to another buddy who couldn’t make it to your gathering, the two of you can share your AirPods, and you’ll still hear the same thing. Or, perhaps, if you’re traveling with your loved one and you fancy a movie, just toggle mono audio mode and give the other person the other AirPod, and you should be good to go!
The best things in life are the ones you can share with the people around you, and that’s something that the AirPods can help you with.
Unfortunately, although both of the AirPods have mics, only one mic can be active during calls. The AirPods automatically takes input from the mic closest to the sound, which results in messy audio if there are overlapping voices.
You can, however, set the AirPods to use just either the left or right mic so that one person can talk back properly to the caller while the other can just speak up if they’re going to say something. Here’s how:
- Connect your AirPods, then go to Settings > Bluetooth, and click the “i” icon beside your AirPods’ name on the screen.
The “i” icon beside your AirPods’ name - Click Microphone
Going to microphone settings - Select from either Always Left or Always Right.
Microphone options for AirPods


AirPod Max Battery Saving Hack
The AirPods Max are the newest additions to the AirPods line. These are the first over-ear headphones from Apple, and their release in 2020 signified the brand’s commitment to expanding its roster of digital accessories.
According to Apple, the AirPods Max can get up to 20 hours of listening time with both the noise cancellation (ANC) and spatial audio turned on.
20 hours isn’t – by all means – bad, but there’s a catch. Currently, there is no way to manually turn them off completely. This means that the headphones’ battery slowly drains even when they’re not in use, as long as they aren’t in the charging case.
Fortunately, Apple designed some workarounds for this issue, and there are two ways to reduce battery consumption with the AirPods Max.
With the Smart Case
Unlike the previous AirPods, the Max comes with a non-charging Smart Case with a dedicated slot for the charger. These headphones can also get 1.5 hours of listening from a mere 5-minute charge.

The first way is to put the AirPods back inside its Smart Case. This case is lined up with integrated magnets that immediately put the AirPods Max in a low power state. After 18 hours inside the case, the AirPods Max will go into ultralow-power mode that drains even lesser power.
Without the Smart Case
If your Smart Case isn’t with you, don’t fret because there’s still another way to save battery, and that is to leave your AirPods Max inactive for 5 minutes. This will prompt the headphones to go into a low power state and then into ultralow-power mode after 72 hours.
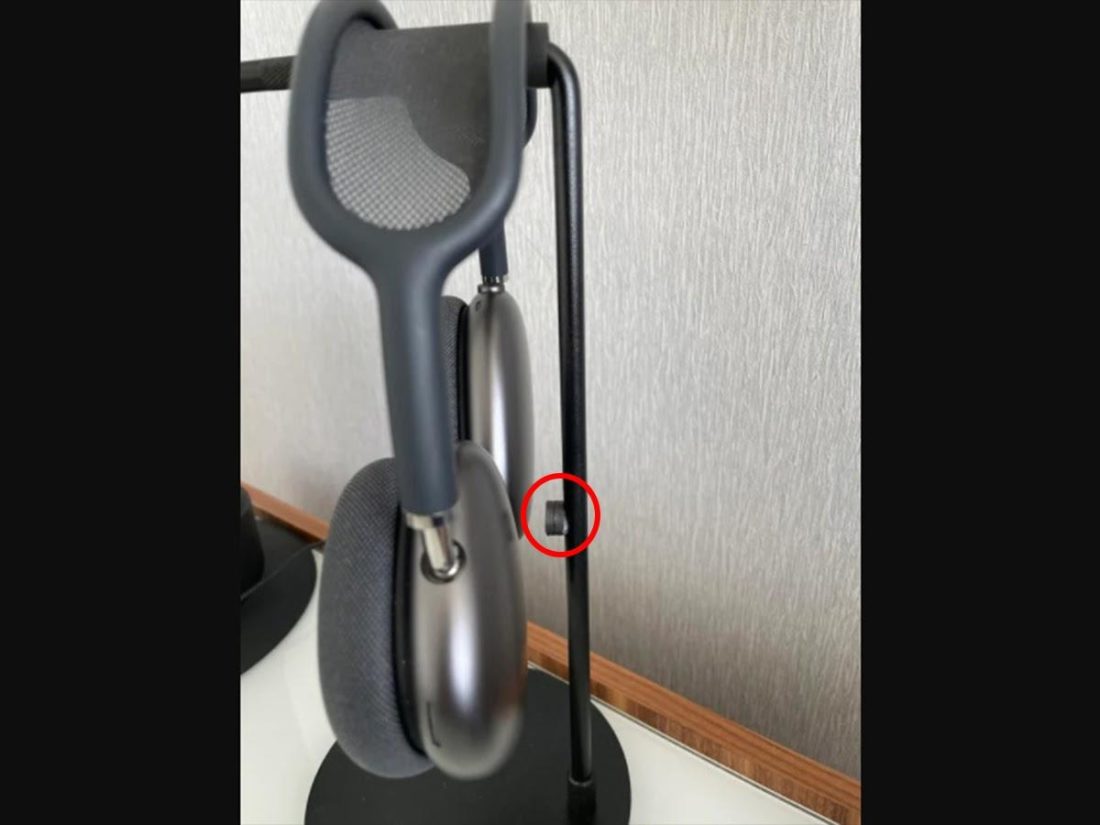
However, if you can’t spare 5 minutes to do this, here’s a nifty trick from thomyork44 on Reddit.
Take two small magnets, perhaps ref magnets, and place them on the stem of a headphone stand. Put the AirPods Max on the stand with the back of the ear cups facing the magnets. This will trick the AirPods into thinking that they’re inside the Smart Case, thus triggering the low power mode immediately.
Make the Most Out of Siri
Siri is one of the first mainstream virtual assistants who really made a mark in the tech industry. With it being one of the pioneers, Siri is relatively more developed than its other counterparts and its intelligence is something that you shouldn’t take for granted.
Siri can execute a plethora of commands like making calls, sending messages, and surfing the web for you. The command possibilities are endless and you can even use the Shortcuts app to help Siri to execute and automate more complicated tasks for you.
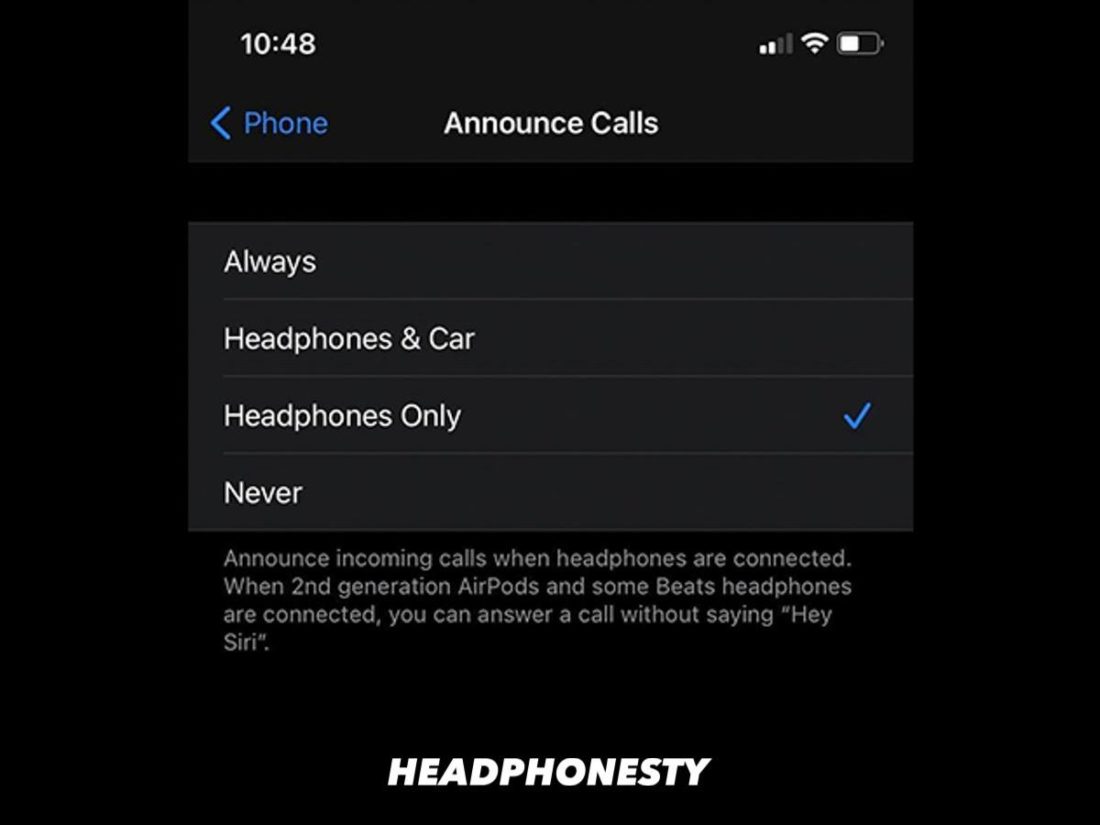
Using Siri takes hands-free operations to the next level since all you really need to do is to say “Hey Siri” followed by the command such as “play BTS on Spotify” or “where is my Apple Watch”. You can set Siri to announce whoever is calling you so you won’t have to check your phone every time. This command is beneficial, especially if you’re carrying your groceries or working out and you couldn’t really pick up your phone.
To do this, simply head on to Settings > Phone > Announce Calls, and choose the option that announces a call when you’re wearing headphones.
You can also have Siri announce and reply to your messages so you’re updated no matter how busy you are. And, the great thing is, this announce messages feature is easy to disable, enable, and customize.
Prolong Your AirPods’ Lifespan by Regular Cleaning
Keeping your AirPods clean at all times lessens the chances of grime build-up and other types of dirt that can lead to problems like ear infections. Aside from that, dirty can also muffle the sound and moisture build-up can lead to electrical damage.
Hygiene is an integral part of gadget care so if you want to keep your AirPods for a long time, pay attention to when and how you clean them.
Each variation of the AirPods have different forms, so cleaning them properly also differs from the other. Let’s go over them one by one.

AirPods
For the regular AirPods, the areas of focus are the inner edges of the speakers where earwax and most dirt build-up. For the charging case, the slots of the AirPods are usually the areas that accumulate dirt the most, while the edges along the opening can also trap debris.
AirPods Pro
One of the major differences between the AirPods and the AirPods Pro is the silicone tip. This part touches your ear the most, so it’s the one that’s most susceptible to dirt. Fortunately, you can simply remove the tips and wash them separately.
Other than that, the case of these two AirPods variations are pretty much the same, so they also have the same areas of concern for cleaning.
AirPods Max
The AirPods Max are the largest among the three AirPods, which makes cleaning a little less meticulous. With these, the area of concern is the headband since it is in contact with the oils and sweat from your head.
Use AirPods as Hearing Assistant
The Live Listen feature from iOS 14 is simply life-changing for many. With this feature, your Apple device can be used as a microphone that automatically sends a live feed to your hearing device.
This feature has a lot of cool applications. For one, if you’re struggling to hear someone talk because of external noise, you can just pop in your AirPods, use this feature, and ask the other person to use your phone as a microphone. Also, if you want to secretly listen to a bunch of unsuspecting people, this is your best bet.
Turning this on is really easy. Here’s how:
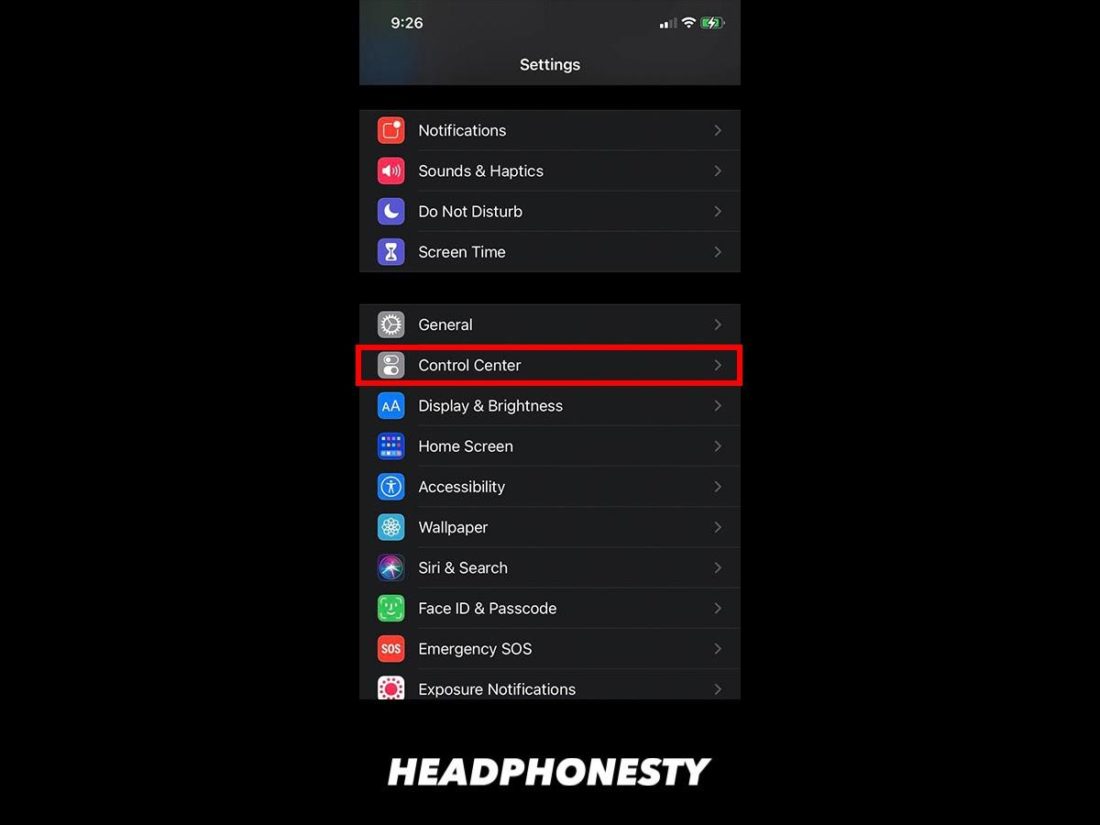
- Head on to Settings > Control Center
Going to Control Center - Scroll down and click the plus sign beside the Hearing function.
Add hearing function - Pull down your Control Center and click the button with the Hearing icon. This will turn the Live Listen feature on.
Enabling Live Listen feature


Hate Silicon? Change Your AirPod Tips to Memory Foam
AirPods Pro users are all too familiar with the problems of silicon tips. Although these tips are the default ones that come out of the box, that doesn’t mean that they are the best ones to use.
Silicon tips are durable, easy to wash, and affordable. However, they tend to lack a good seal which causes audio leakage and they can also get slippery with sweat. Oftentimes, silicon tips are also borderline uncomfortable, which is why most people now prefer memory foam.
Memory foam tips address the main concerns for their silicon counterparts. Memory foam allows better fit and seal because it can contort to the actual shape of your ears. This lessens the chances of the AirPods falling out even if you’re active and sweaty. Also, because they are foam, these tips provide better cushioning and overall comfort.
Unfortunately, generic foam tips won’t attach to the AirPods Pro due to their different attachment style. You can try to invest in store-bought memory foam tips made for AirPods, but there’s also a way to make the foam tips happen by inserting the foam underneath the silicone tips.
You’ll only be needing the original silicone tip, a paper clip, and memory foam tips for this one. Here’s how:
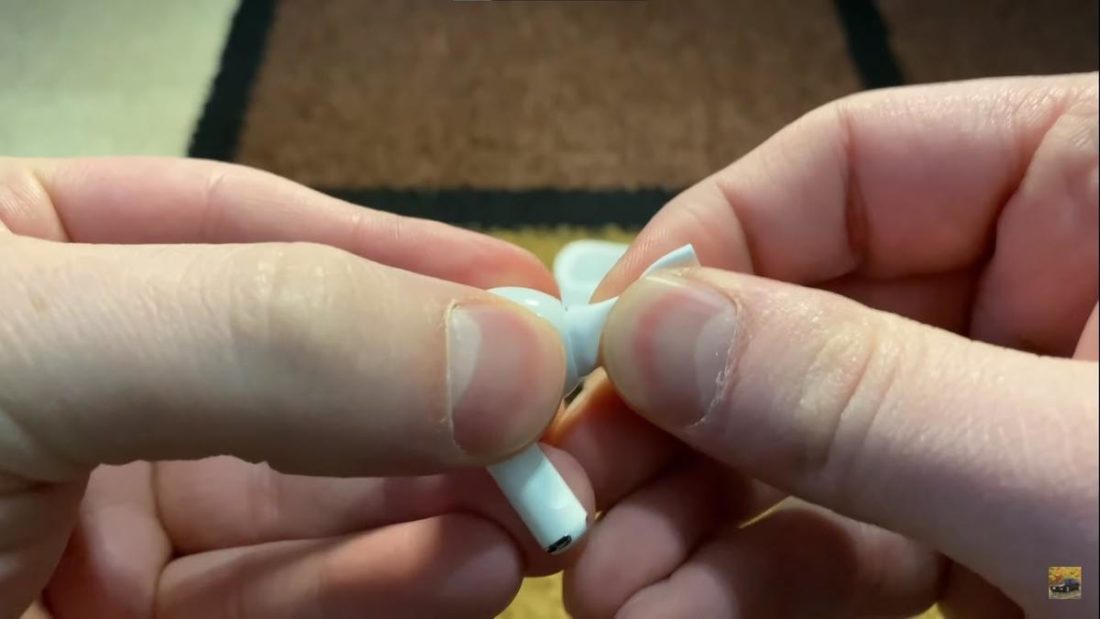
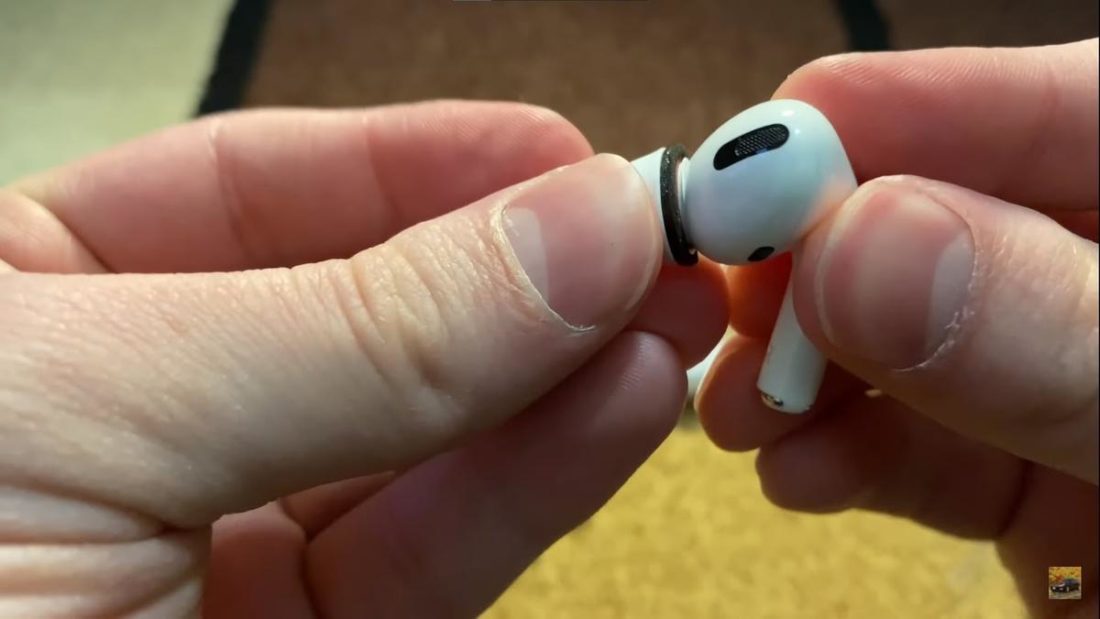
- Remove the AirPods Pro silicone tip by raising the flap and pulling it out of the speakers.

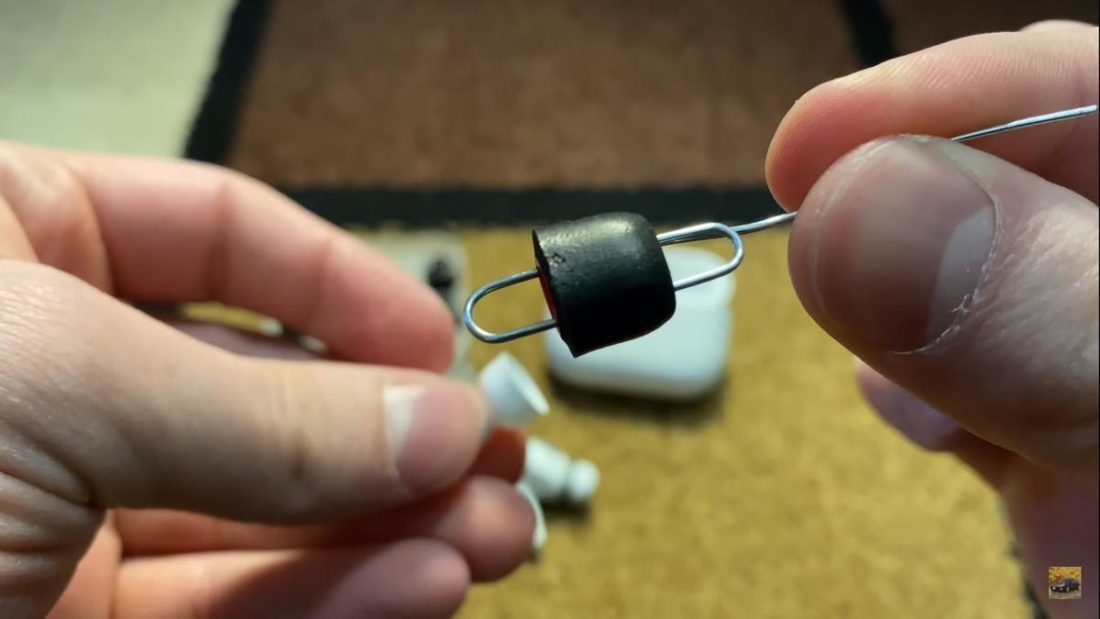
Removing the AirPods Pro silicone tip (From: Youtube/Scott Schramm) - Stick the paper clip inside the foam tips and do so until the tip is halfway through the clip, as seen on the picture below.
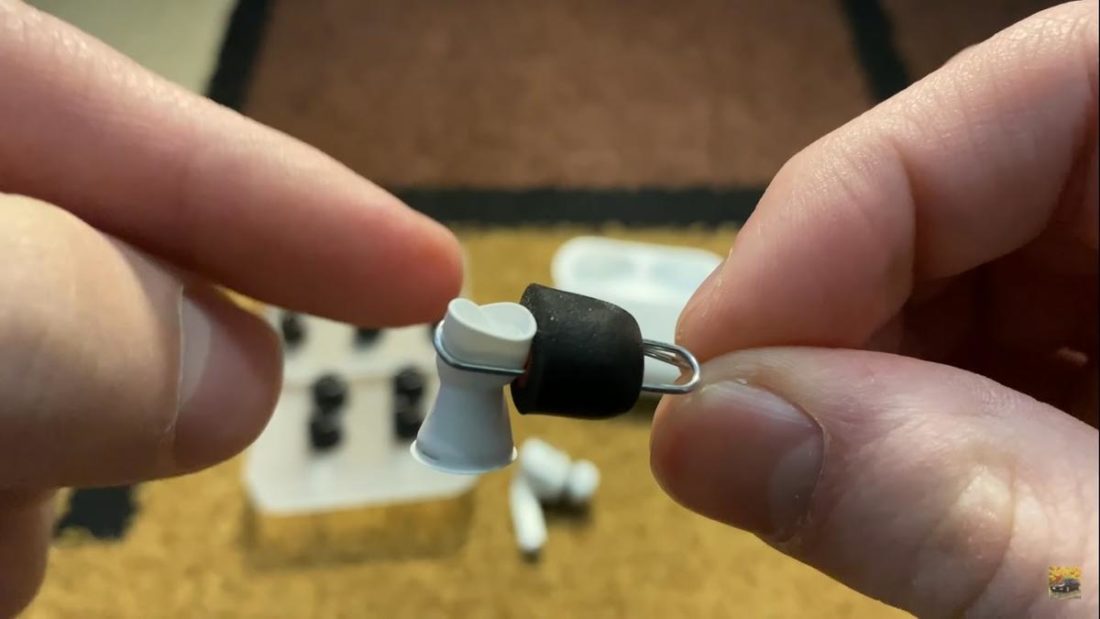
Pushing the paper clip into the extra foam tips (From: Youtube/Scott Schramm) - Thread the silicone tips inside the hole left by the paper clip until the tip is halfway through.
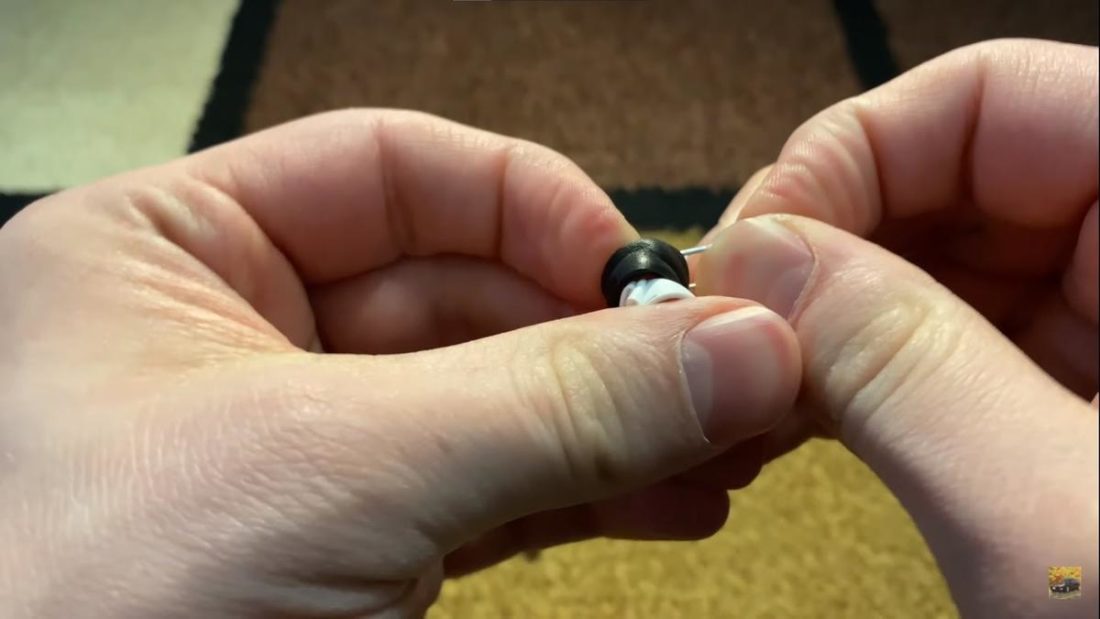
AirPods Memory Foam Tip hack by Scott Schramm (From: Youtube/Scott Schramm) - Pull up the paper clip while widening the top opening of the foam tips until the silicon tip’s flap makes it through.
Pulling the paper clip to get the silicone flap through the foam tip (From: Youtube/Scott Schramm) - Put the AirPods Pro silicon flap over the foam tips and put the tips back onto the earbuds.
Putting the AirPods Pro tips back (From: Youtube/Scott Schramm)
Follow Scott Schramm’s tutorial on YouTube for a more detailed explanation.
Use Your Airpods with Non-Apple Devices
The AirPods may be one of Apple’s flagship products, but these listening devices are not limited to Apple devices only. At the core of it all, the AirPods are wireless Bluetooth devices so they could connect to any Bluetooth-ready device like Android phones and laptops.
However, pairing AirPods with a non-Apple device would limit their functionality. For one, you wouldn’t be able to easily check the battery status of the AirPods just by opening the case lid. Ear detection, double-tap customization, and Siri won’t be around as well.
Connecting your AirPods to a non-Apple device is pretty straightforward. Here’s how:
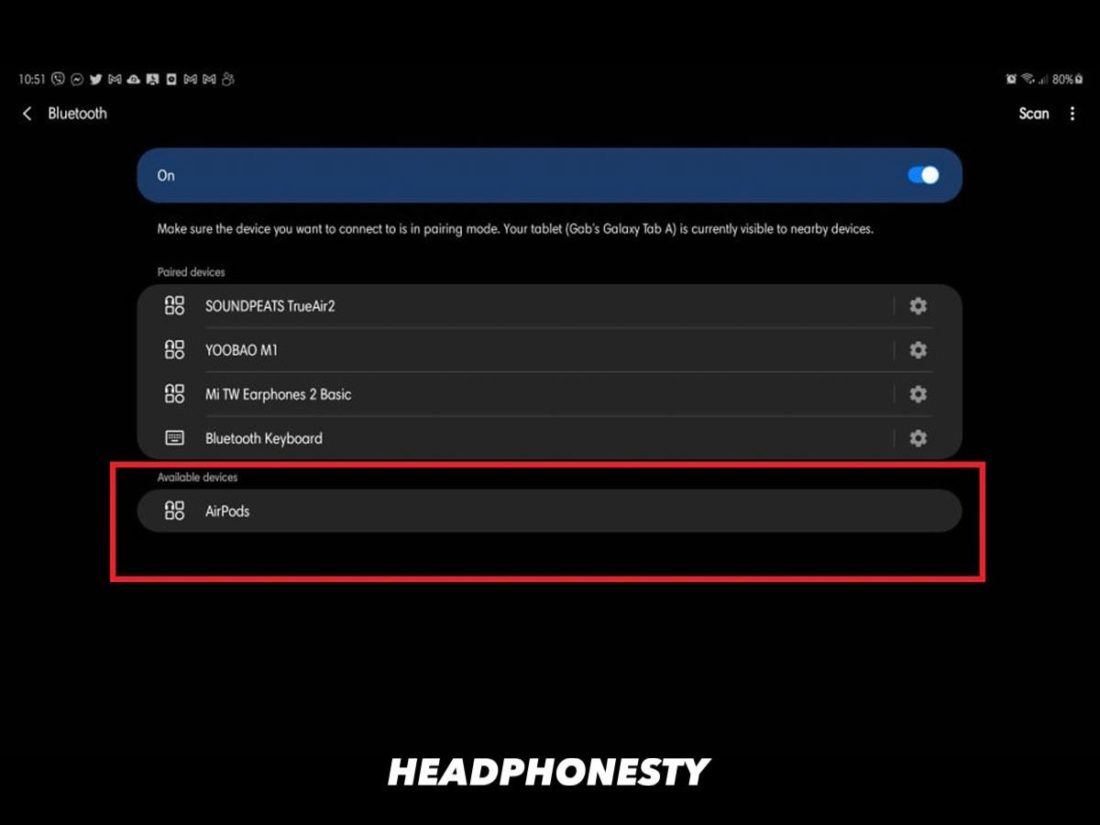
- Head to the Settings > Bluetooth and scan for new devices.
Scan for Bluetooth devices via Android - While your phone is scanning, hold the multipurpose button on your AirPods until they flash white, and they should appear on your available devices.
- Press the AirPods and pair it with your device.
Selecting AirPods

Conclusion
With all these tips, tricks, and hacks in mind, you should be a master of your AirPods in no time. Life will be much easier for you and most of the things you need to do are a voice command or two taps away.
Now, you wouldn’t have to bother fumbling around your phone during rush or interrupting your sets during workout to switch songs.
Which hacks did you find the most interesting? Do you have any other life-changing hack up your sleeve that we might have missed? Share it with us through the comments.