
A detailed guide to permanently deleting Free and Premium Spotify accounts, plus a bonus tip on retaining your playlists.
While Spotify is one of the most widely-used music streaming services in the world, seeing about 422 million active users per month in over 180 countries, a slew of controversies has increasingly mired its good reputation over the years.
Many of these issues have become dealbreakers, prompting a hard-pressed few to cancel their Spotify subscriptions.
The problem is that canceling a Spotify subscription isn’t enough if you want to disassociate from the service altogether.
Your profile and created playlists will still exist on the app. Even worse, your personal data and information also remain for Spotify to continue using.
No worries! If you’re 100% ready to opt out of Spotify and have been wondering how you can delete your account, here’s a definitive guide on doing just that – including a bonus tip on how to transfer your beloved playlists to your next streaming platform. So, let’s get into it!
In This Article
Deleting vs. Canceling Spotify: What’s the Difference?
As we briefly touched on earlier, there is a difference between canceling a Spotify subscription and deleting a Spotify account.
When you cancel your subscription, you’re basically forfeiting a paid plan and all the premium features that come with it. This includes features like higher audio quality, unlimited track skips, and the ability to download songs.
Your existing profile will remain accessible on Spotify, including personal playlists, saved songs, albums, and listening history. However, your account will revert to a Spotify Free account, giving you limited access to your music. That means goodbye to on-demand listening and hello to obligatory ads.
On the other hand, permanently deleting a Spotify account removes it from the service entirely. You’ll lose your profile, personal playlists, and saved music, including any followers you’ve amassed. Even your username will no longer be reusable on Spotify.
So, should you cancel or delete your Spotify account?
Well, if you’re satisfied with Spotify and are perhaps just trying to cut back on expenses, canceling your subscription is the safe way to go. This lets you keep your music or podcast collection intact until you’re ready to resubscribe to Premium.
If, however, you have no intention of using Spotify anymore, either because you’re finished with music streaming services or switching to a new one, it’s best to tie up loose ends, deactivate your account, and start afresh.
Deleting your Spotify account isn’t as straightforward as one might think. It’s not like there’s a ‘Delete’ button you can press, and *poof* it’s done! It’s a bit more of a drawn-out process that involves several steps. We’ve talked more about it in the sections below.
How to Delete Your Spotify Account
Before you can delete your Spotify account, there are a couple of things you should know:
- You cannot delete a Premium Spotify account by yourself. You’ll have to go through Spotify’s customer support bot and cancel your Spotify subscription before attempting to delete your existing account.
- You cannot delete a Spotify account through mobile or desktop apps. You’ll need to log into your account via web browser and complete the steps.
That being said, there are two ways to delete a Spotify account depending on the type of account you have (Free or Premium). Here’s how to do both:
For canceled Spotify Premium accounts:
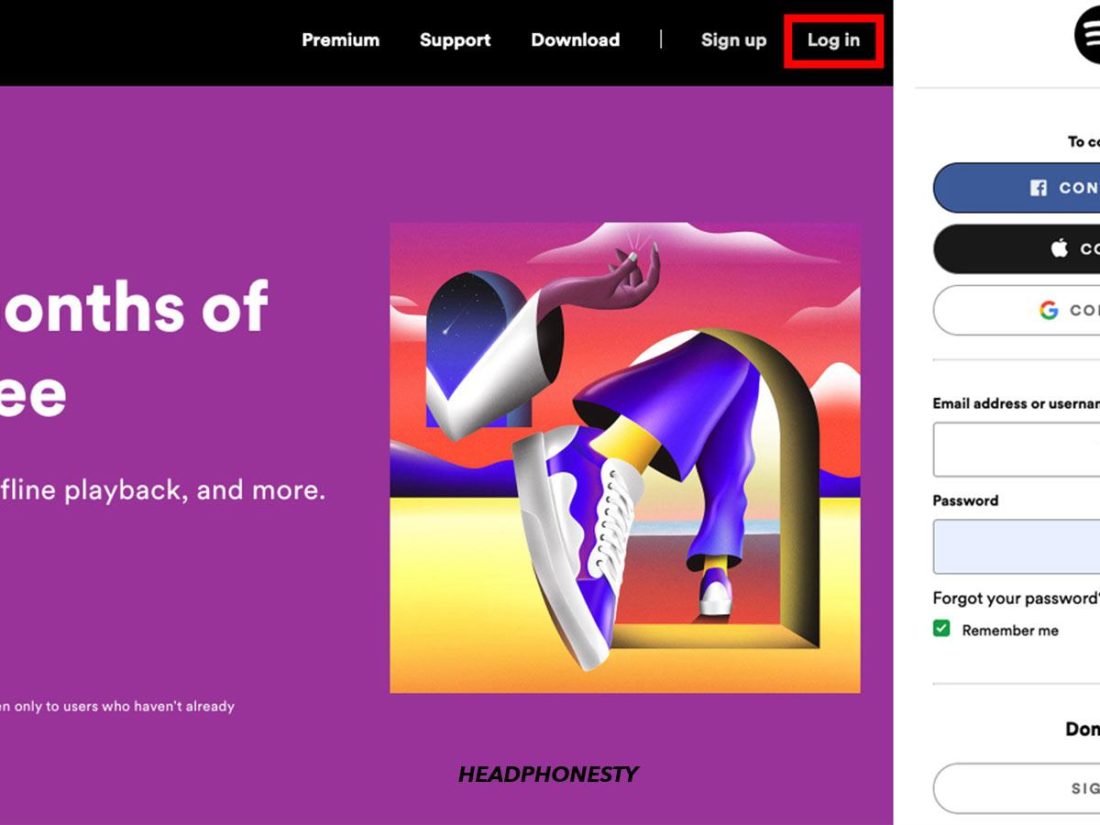
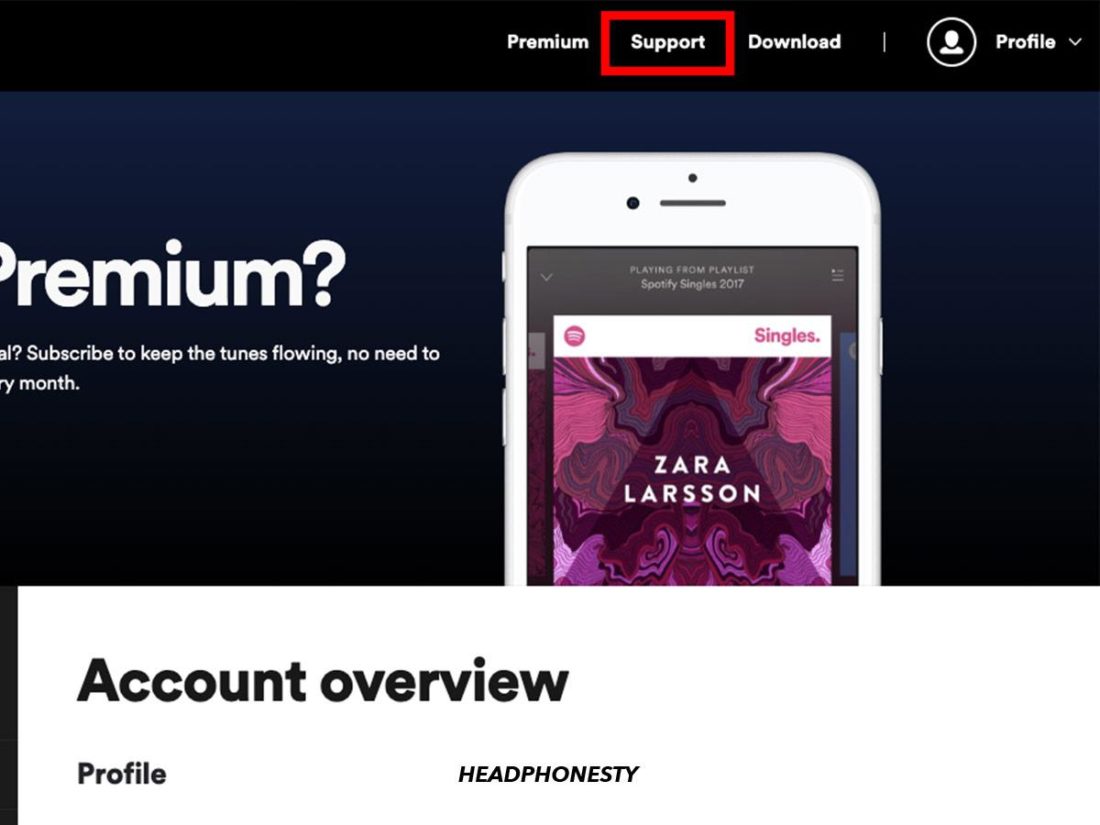
- Log into your account on the Spotify website.

Log into Spotify Account Overview page. - Select ‘Support’ on the Account Overview page.
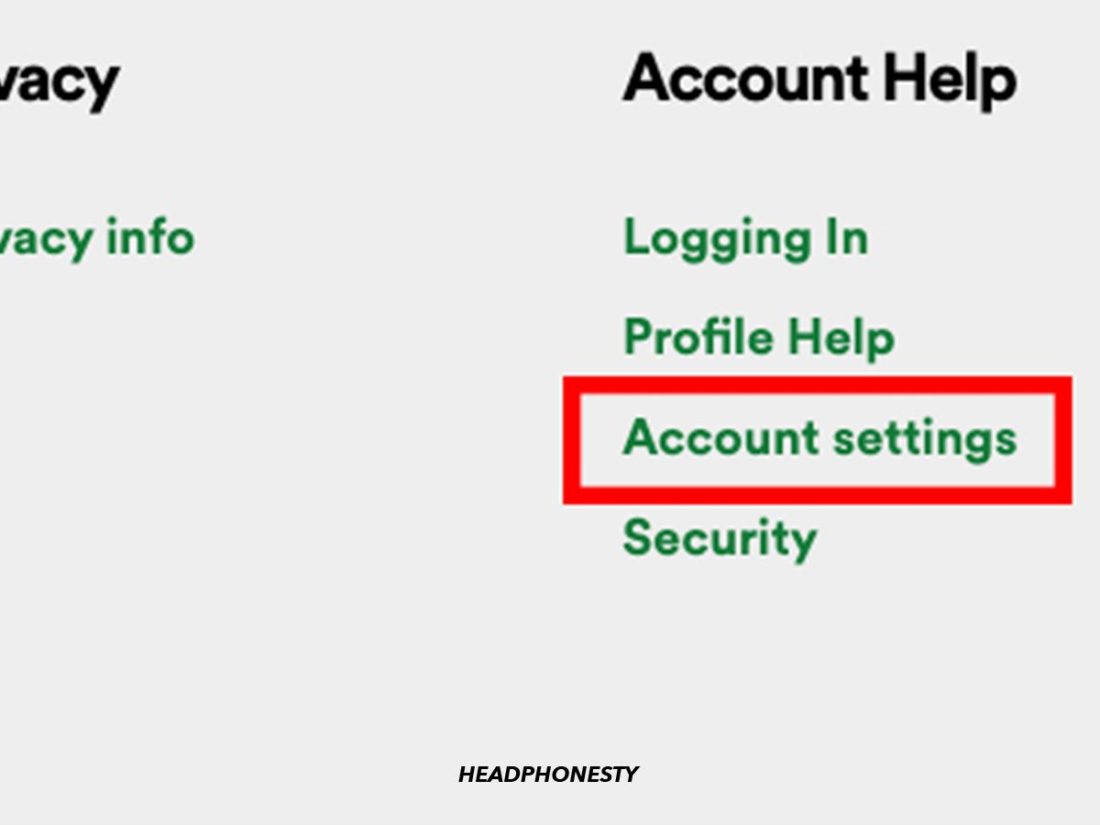
‘Support’ on the Account Overview page. - Scroll down and select ‘Account settings’ under Account Help.
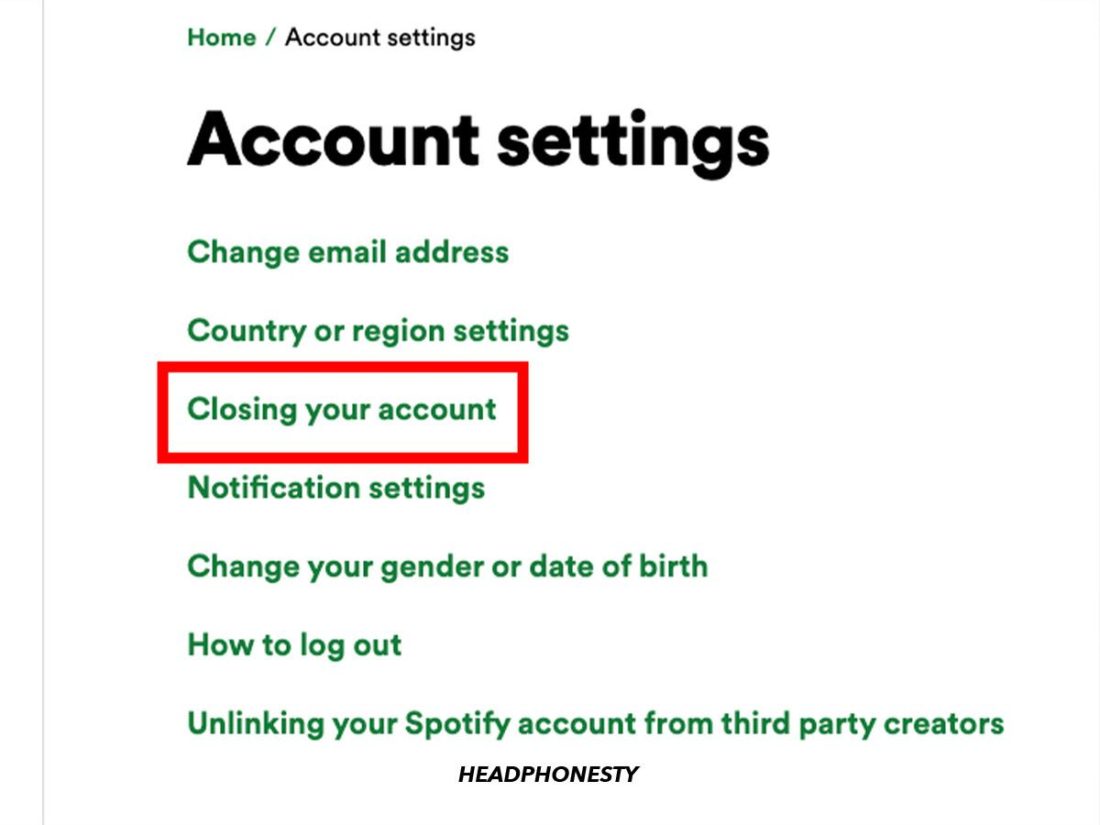
‘Account settings’ on the Spotify Support page. - Select ‘Closing your account’ from the list.
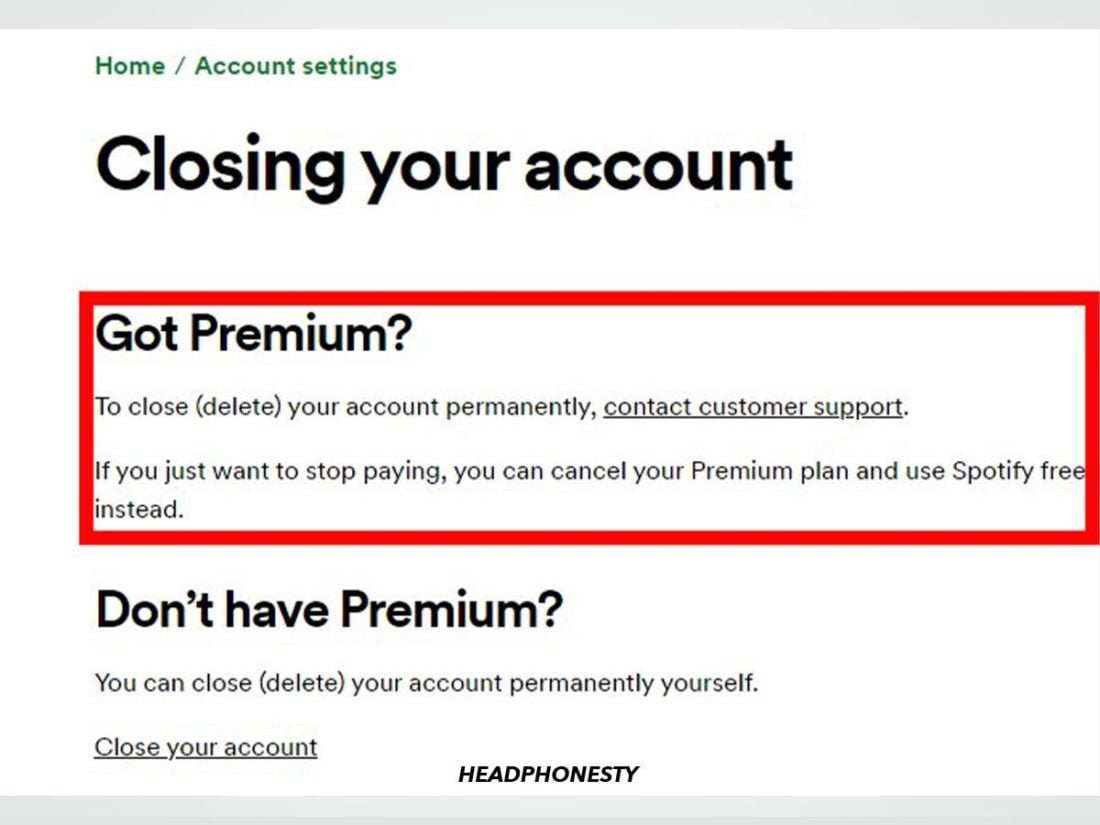
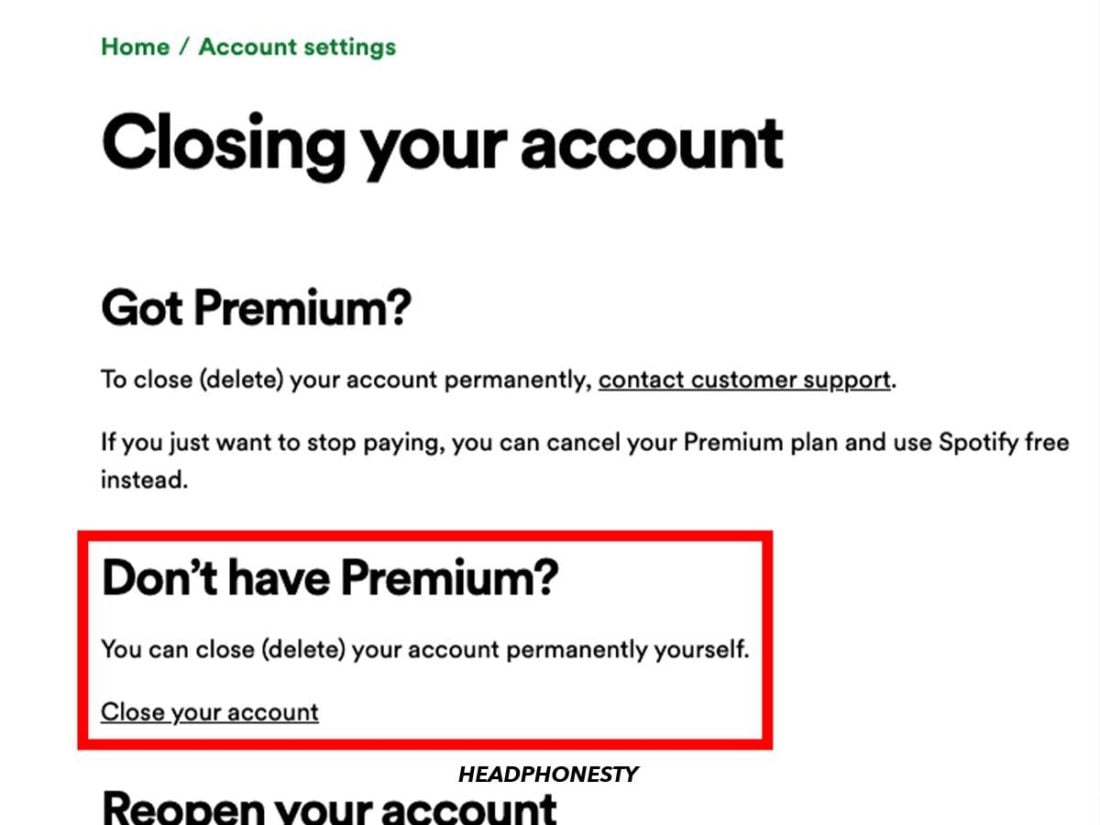
‘Closing your account’ in Account Settings. - Select ‘contact customer support’ under ‘Got Premium?’
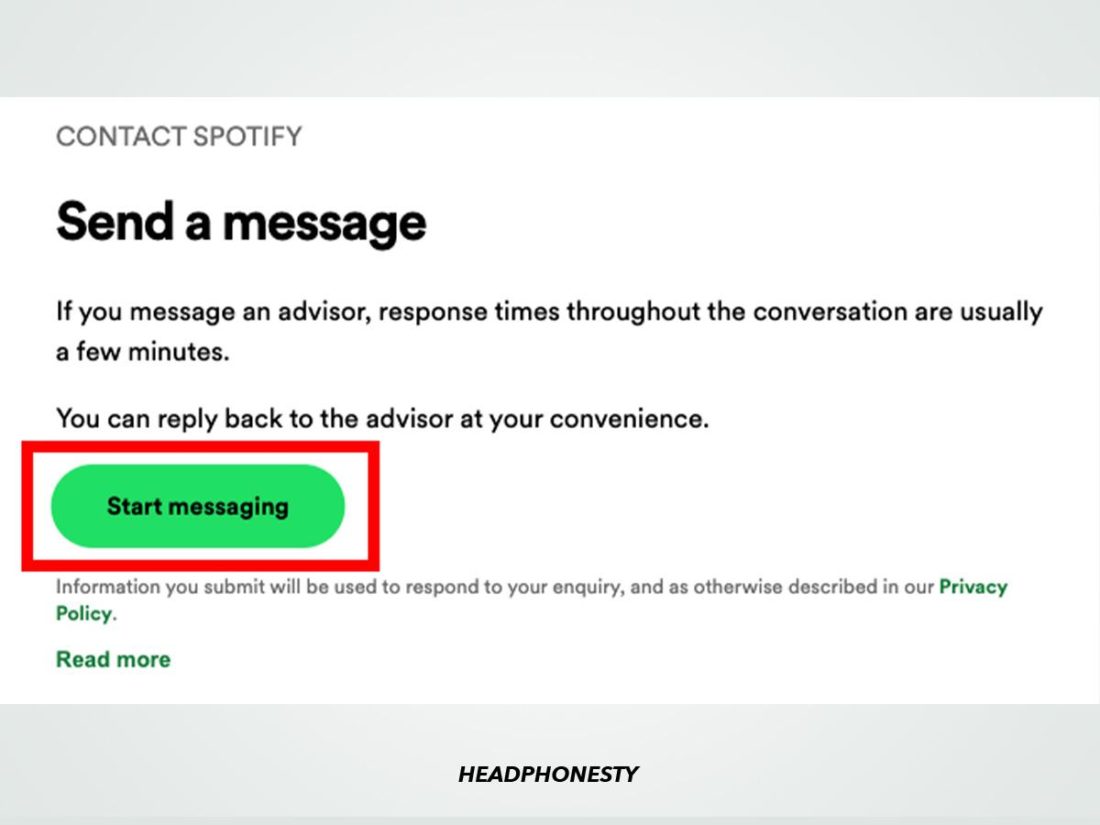
‘Contact customer support’ in Account Settings. - Select ‘Start messaging’ to initiate a chat with Spotify’s customer support bot.
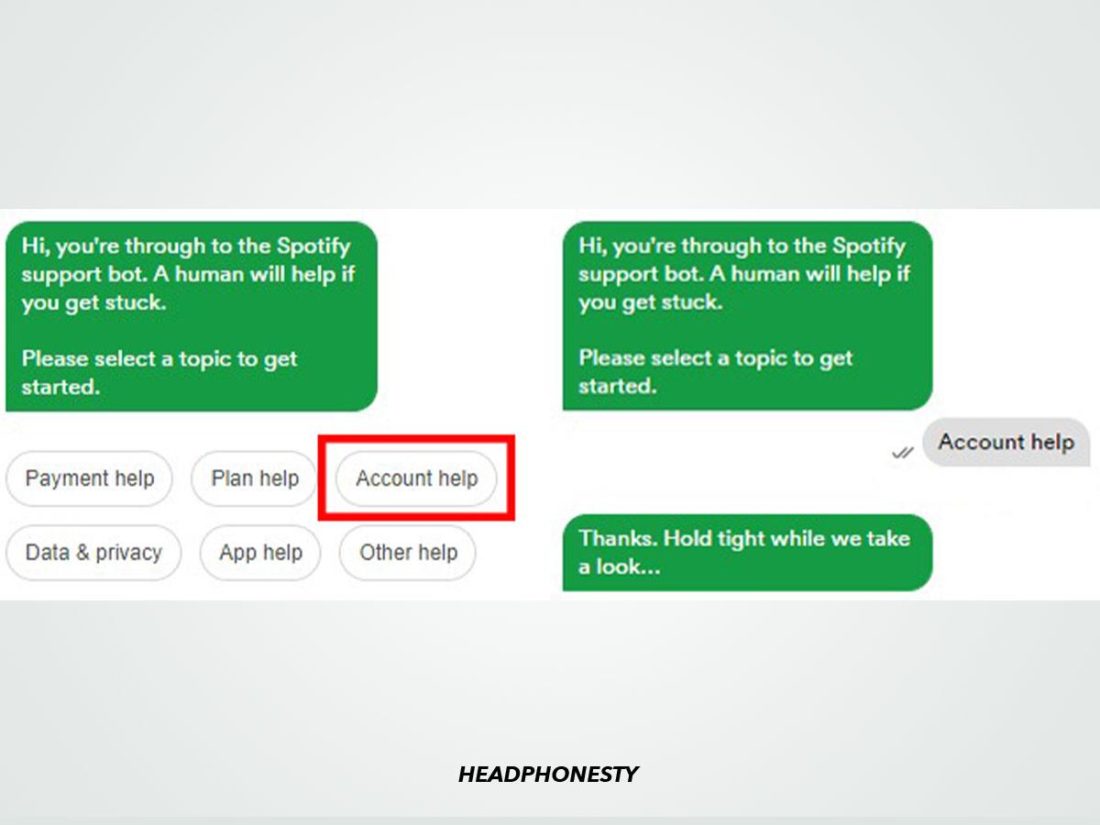
‘Start messaging’ in Spotify’s customer support page. - When prompted, select ‘Account help’ from the chatbox options.
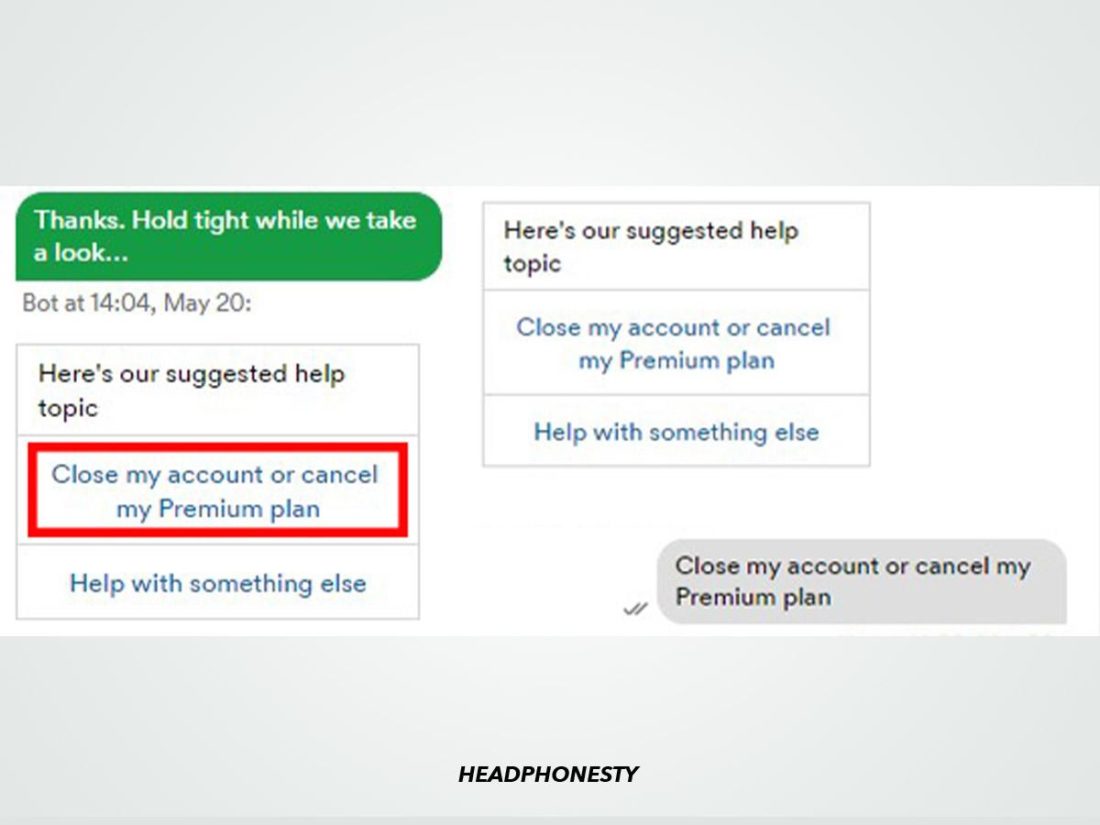
‘Account help’ in Spotify customer support chatbox. - Select ‘Close my account or cancel my Premium plan’ from the chatbox options.
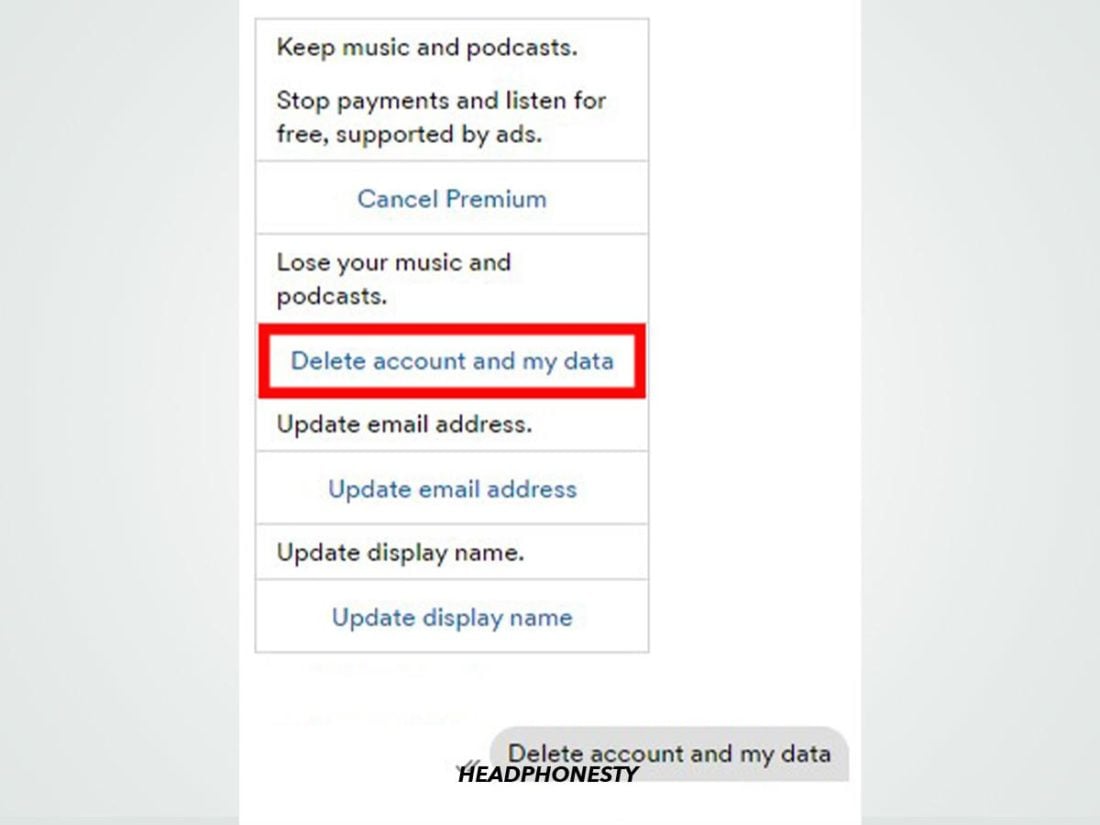
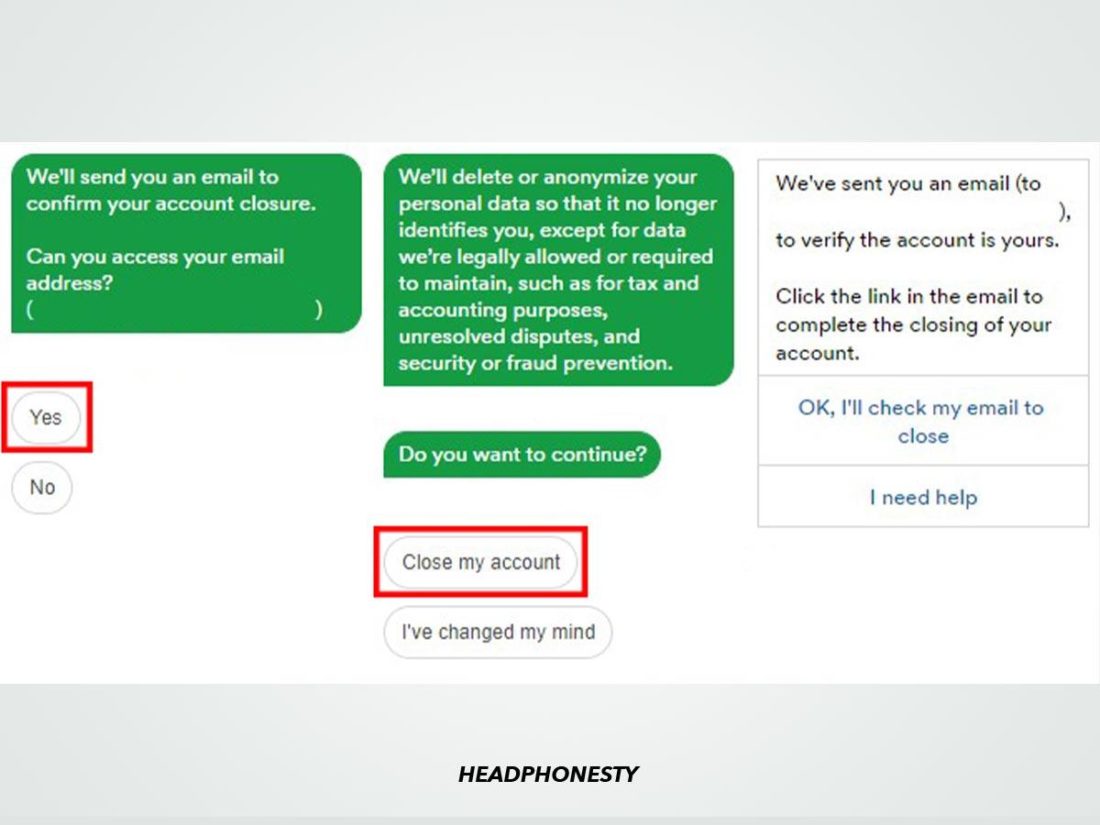
‘Close my account or cancel my Premium plan’ in Spotify customer support chatbox. - Select ‘Delete account and my data’ from the next set of chatbox options.
‘Delete account and my data’ in Spotify customer support chatbox. - Confirm your email address by selecting ‘Yes,’then ‘Close my account’.
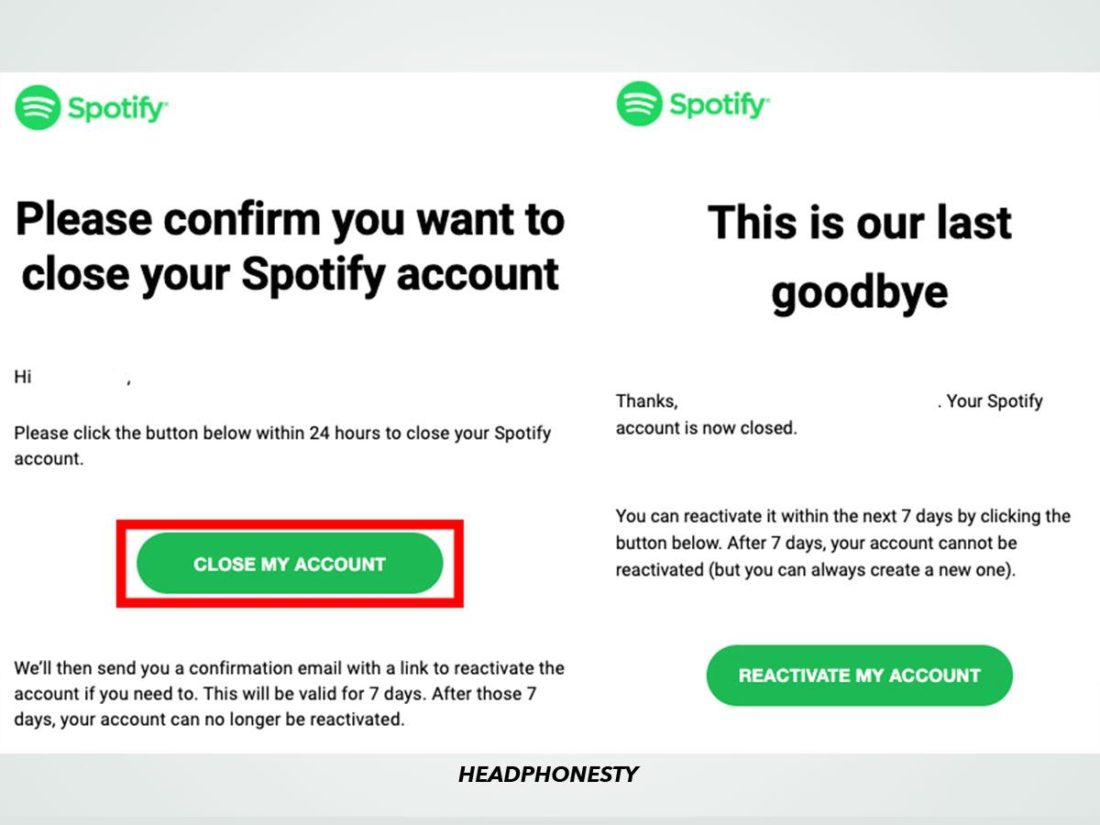
‘Close my account’ in Spotify customer support chatbox. - In the email from Spotify, select ‘Close My Account,’ and that’s it!
‘Close My Account’ link in Spotify email.

For Spotify Free accounts:
- Log into your account on the Spotify website.
Log into Spotify Account Overview page. - Select ‘Support’ on the Account Overview page.
‘Support’ on the Account Overview page. - Scroll down and select ‘Account settings’ under Account Help.
‘Account settings’ on the Spotify Support page. - Select ‘Closing your account’ from the list.
‘Closing your account’ in Account Settings. - Select ‘Close your account’ under ‘Don’t have Premium?’
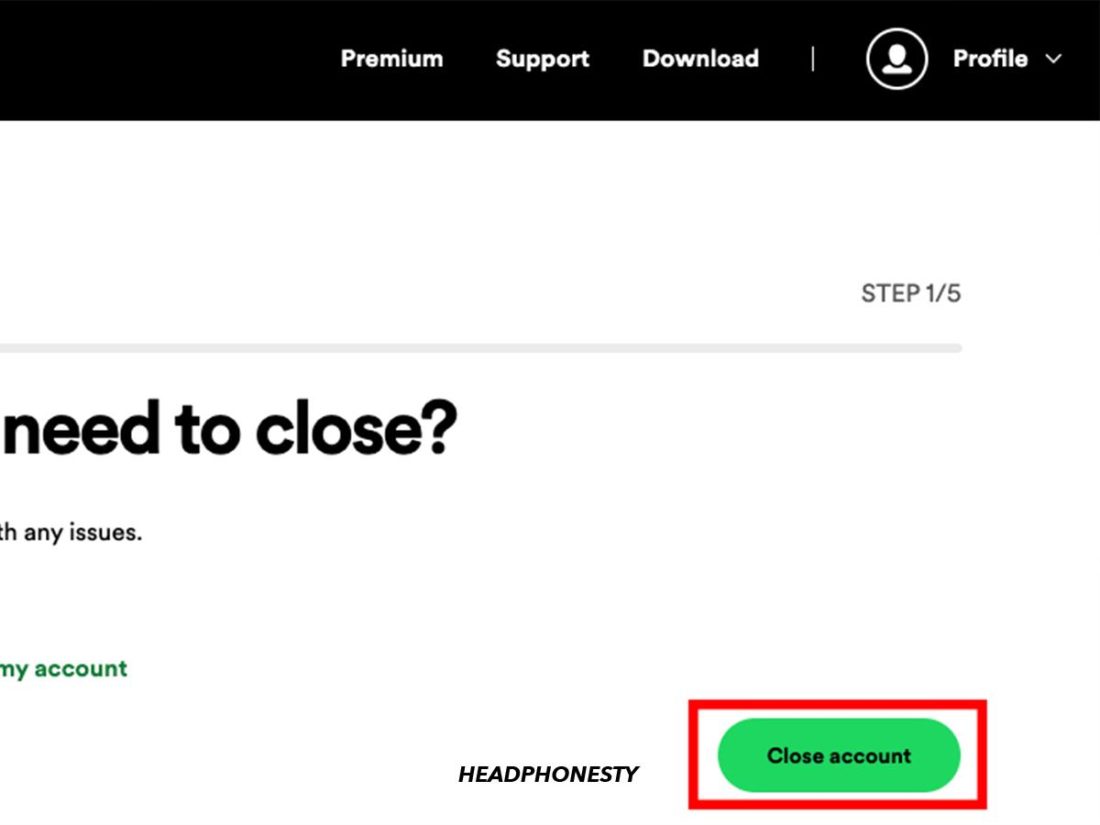
‘Close your account’ in Account Settings. - For step 1, select ‘Close account.’
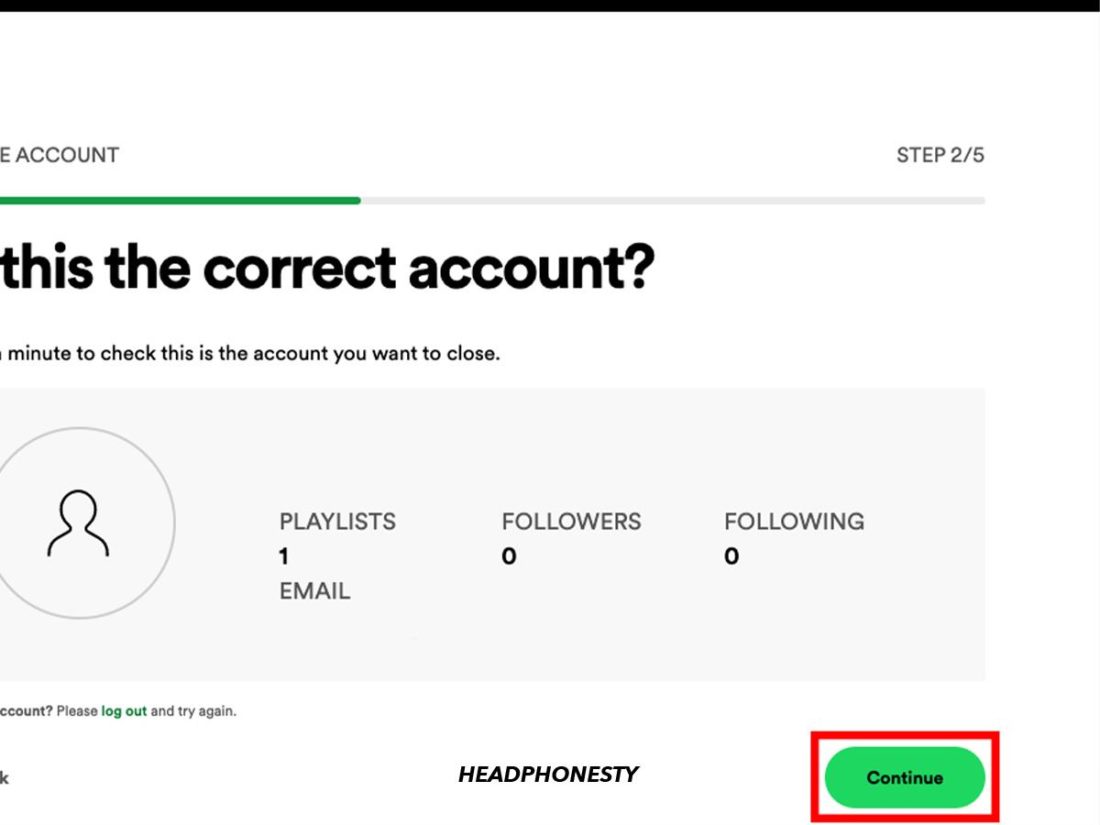
Step 1 in the ‘Close Account’ procedure. - For step 2, check that the correct account is specified and select ‘Continue.’
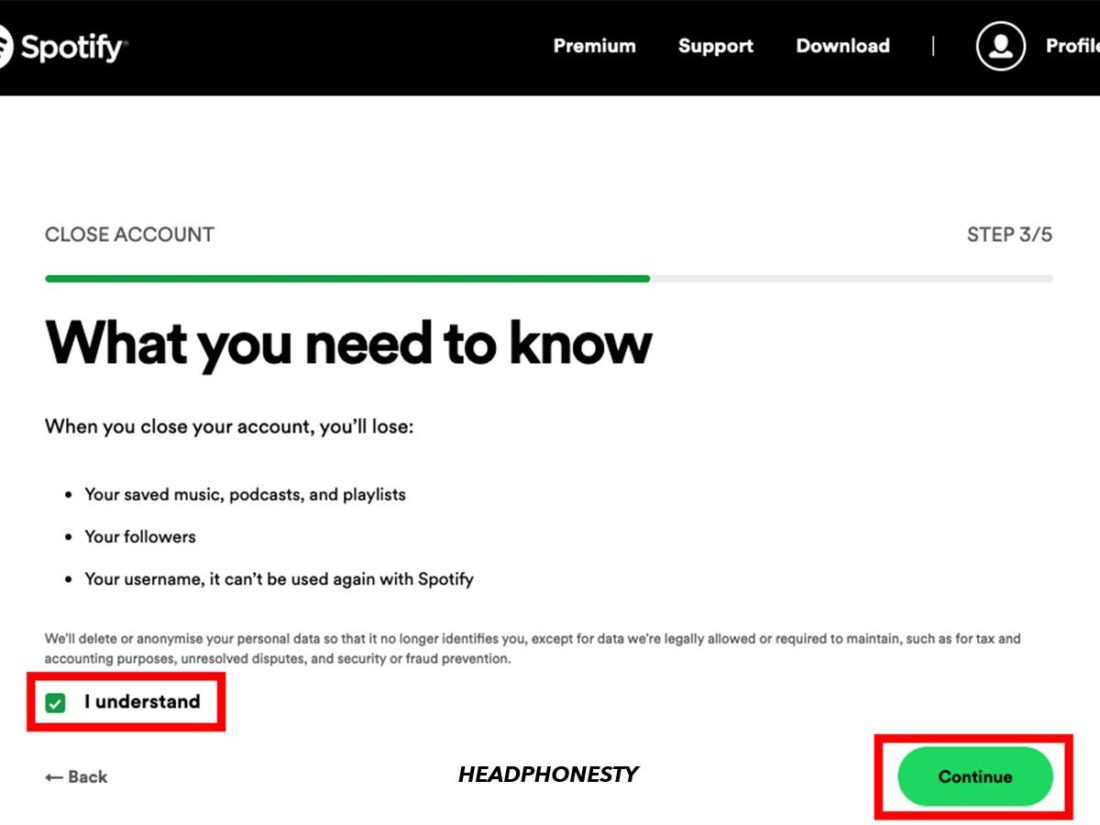
Step 2 in the ‘Close Account’ procedure. - For step 3, select ‘I understand,’ then ‘Continue.’
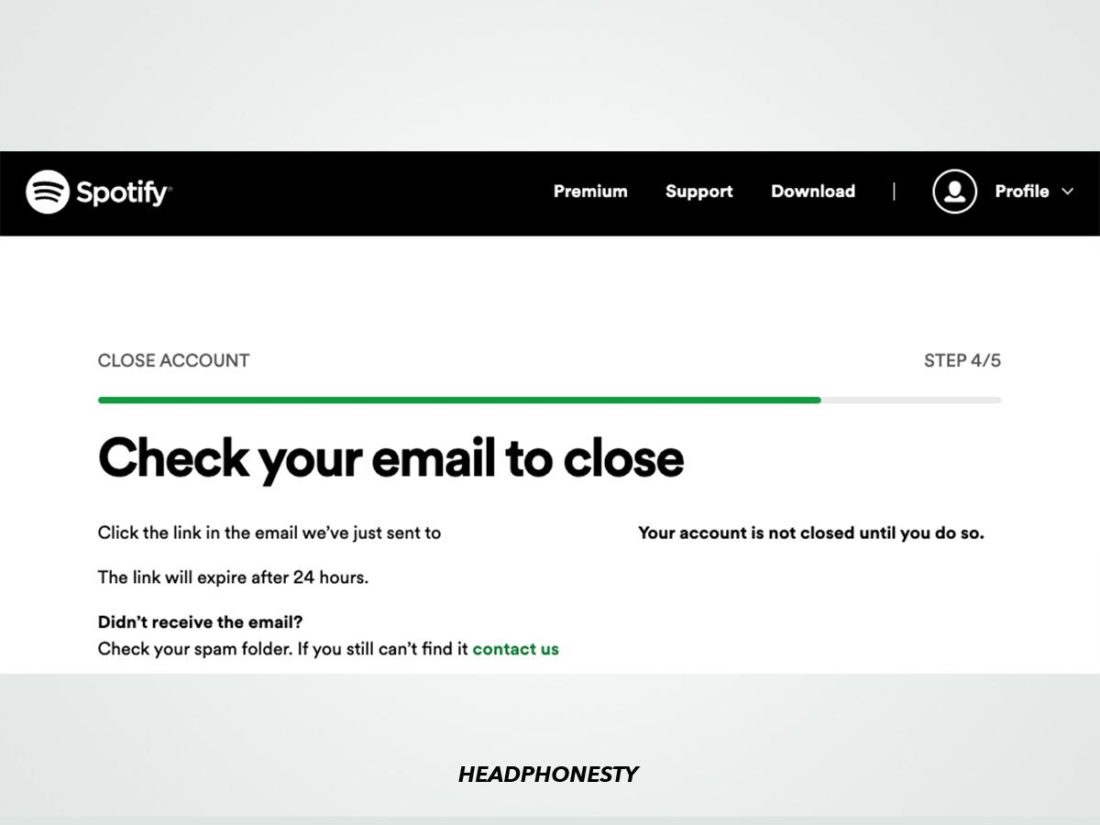
Step 3 in the ‘Close Account’ procedure. - Check your inbox for an email from Spotify.
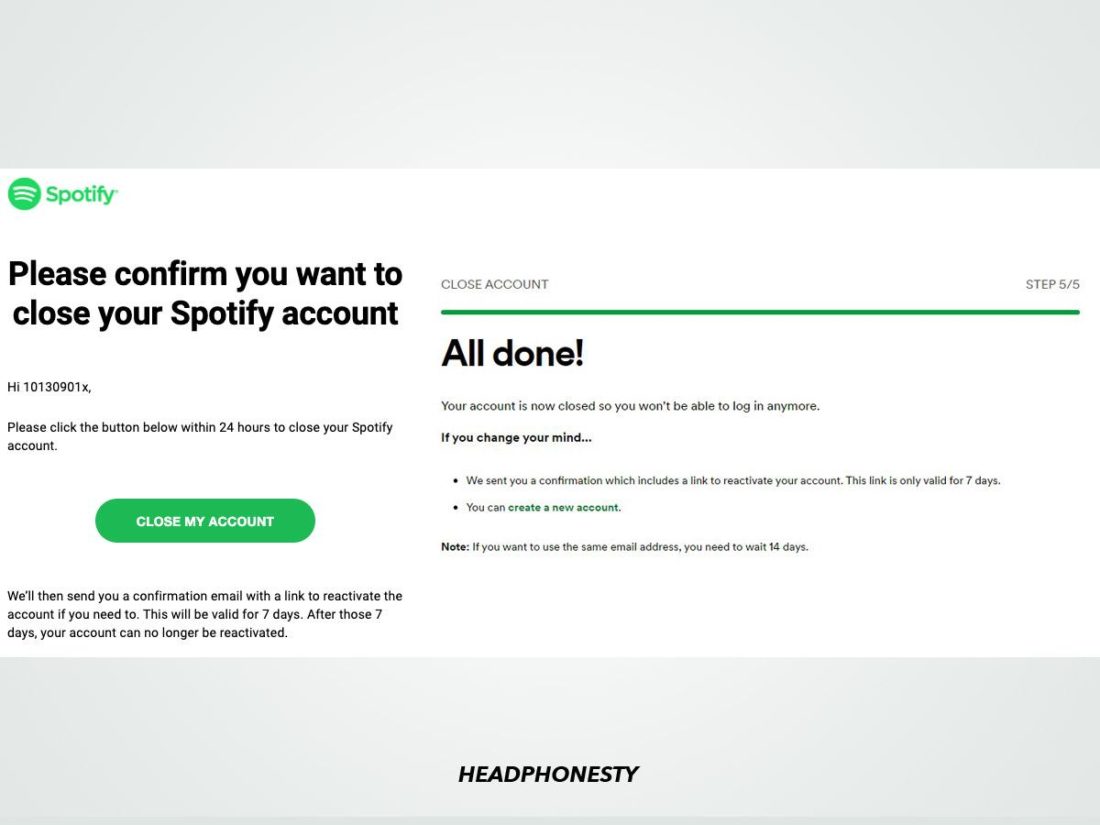
Step 4 in the ‘Close Account’ procedure. - Select ‘Close My Account’ in the email, and you’re all done!
‘Close My Account’ link in Spotify email.


Bonus Hack: How to Transfer Spotify Playlists to Other Platforms
Any music lover knows how much time and effort goes into curating a music collection, so it’s difficult to simply abandon all that work to start over on another streaming service. The daunting task of manually searching and re-adding songs to your music library also makes many people hesitant to make the switch.
Fortunately, there are apps designed specifically to make transferring entire music libraries and playlists easier from one streaming service to another. The most popular of these include SongShift, Tune My Music, and Soundiiz.
Soundiiz, in particular, is the most mentioned and recommended music transfer app on board. It has a mobile app for Android devices and a web app, which is highly recommended for easier navigation.
Here’s a step-by-step guide for transferring Spotify playlists via a free Soundiiz account:
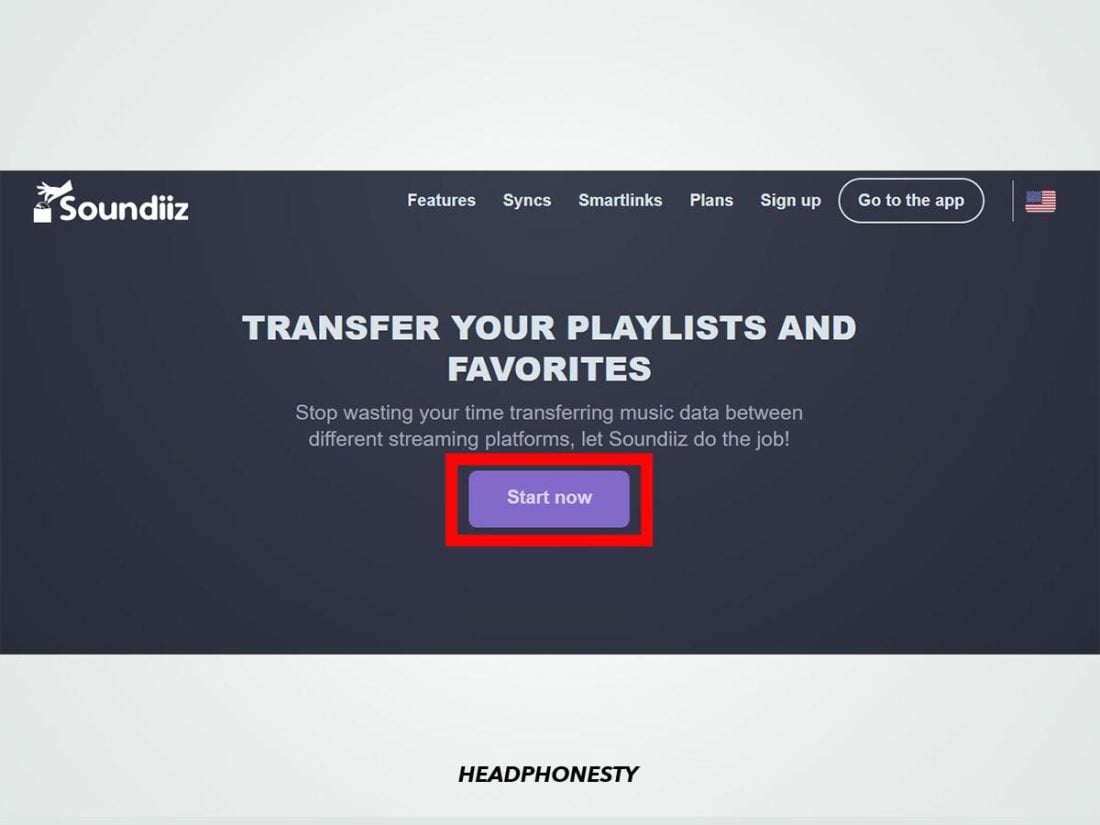
- Go to the Soundiiz website and select ‘Start now.’
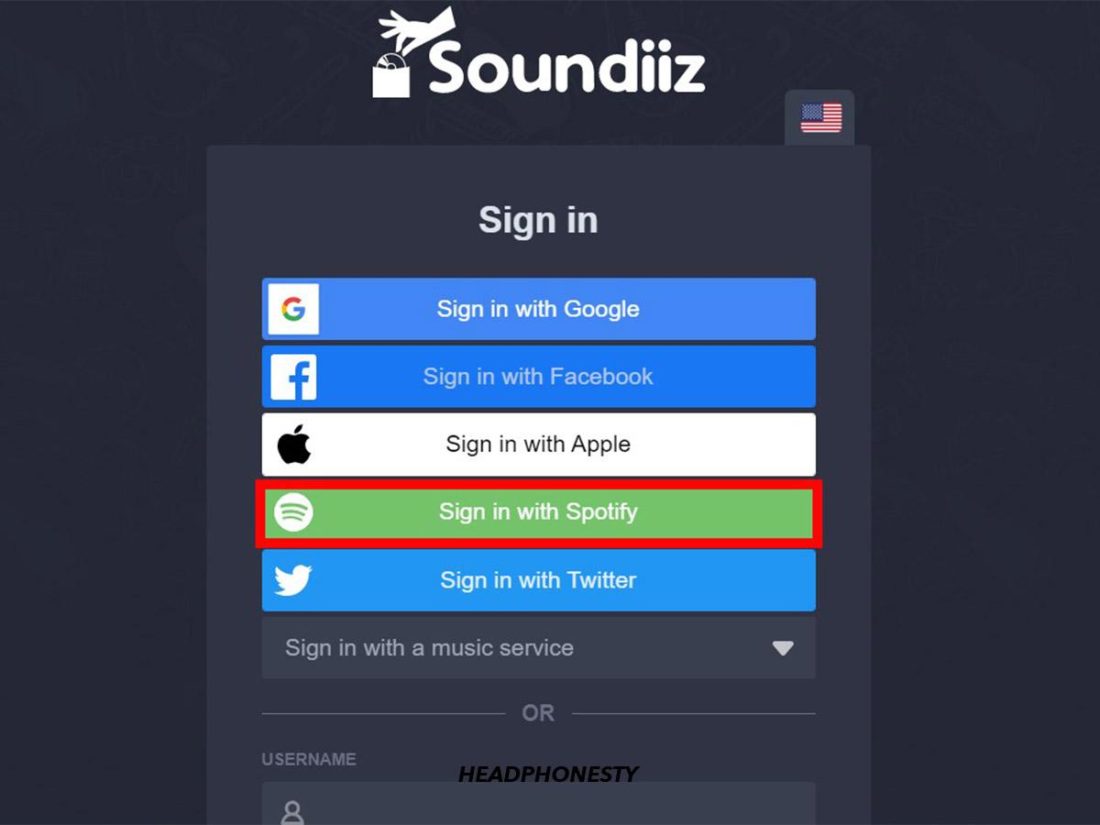
‘Start now’ on the Soundiiz landing page. - Choose ‘Sign in with Spotify.’
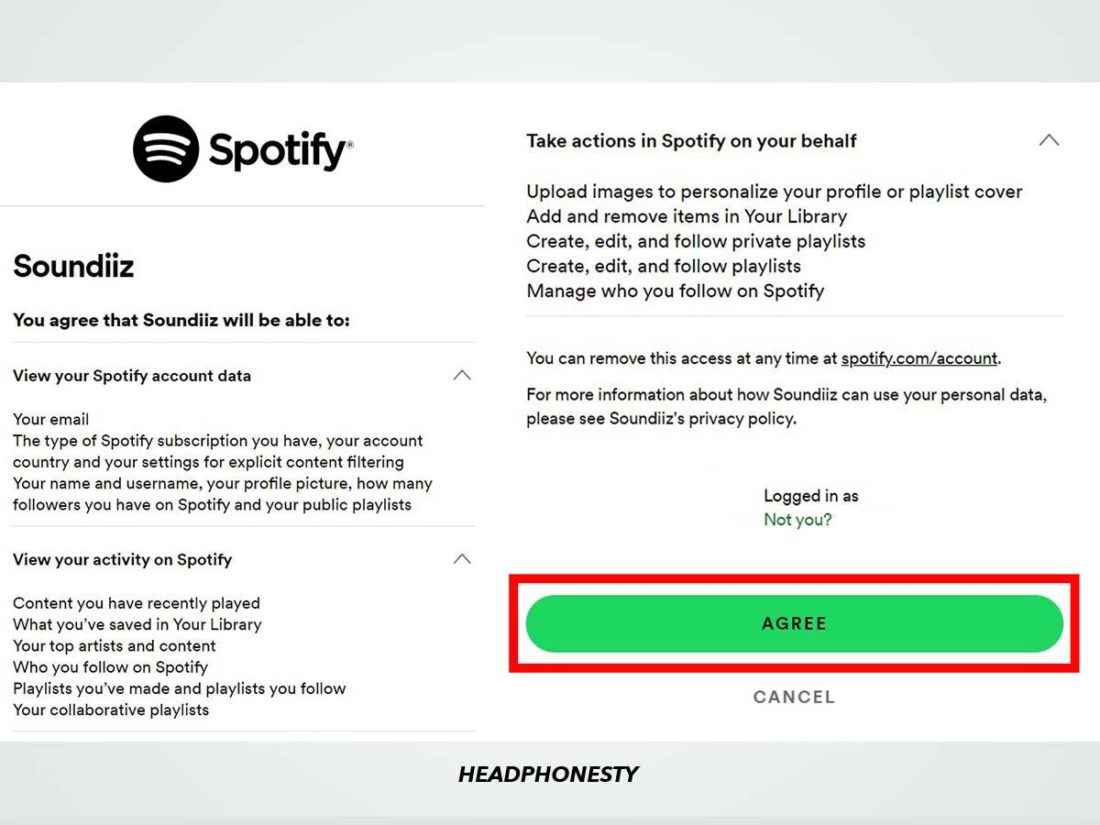
The Soundiiz sign-up page. - Scroll to the bottom and select ‘Agree’ to grant Soundiiz permission to access your Spotify account.
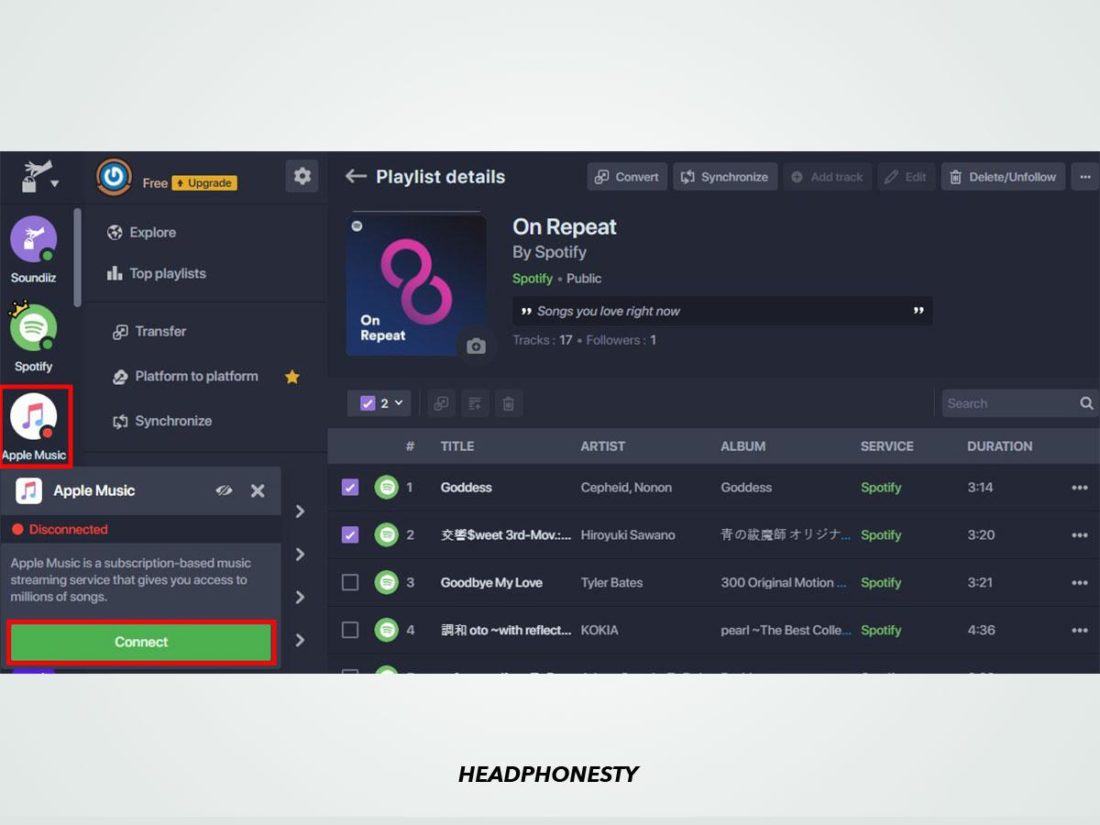
Granting Soundiiz access to Spotify account. - On the left sidebar, select the music streaming service you want to transfer your music to (in this case, we’ll use Apple Music), then click ‘Connect.’
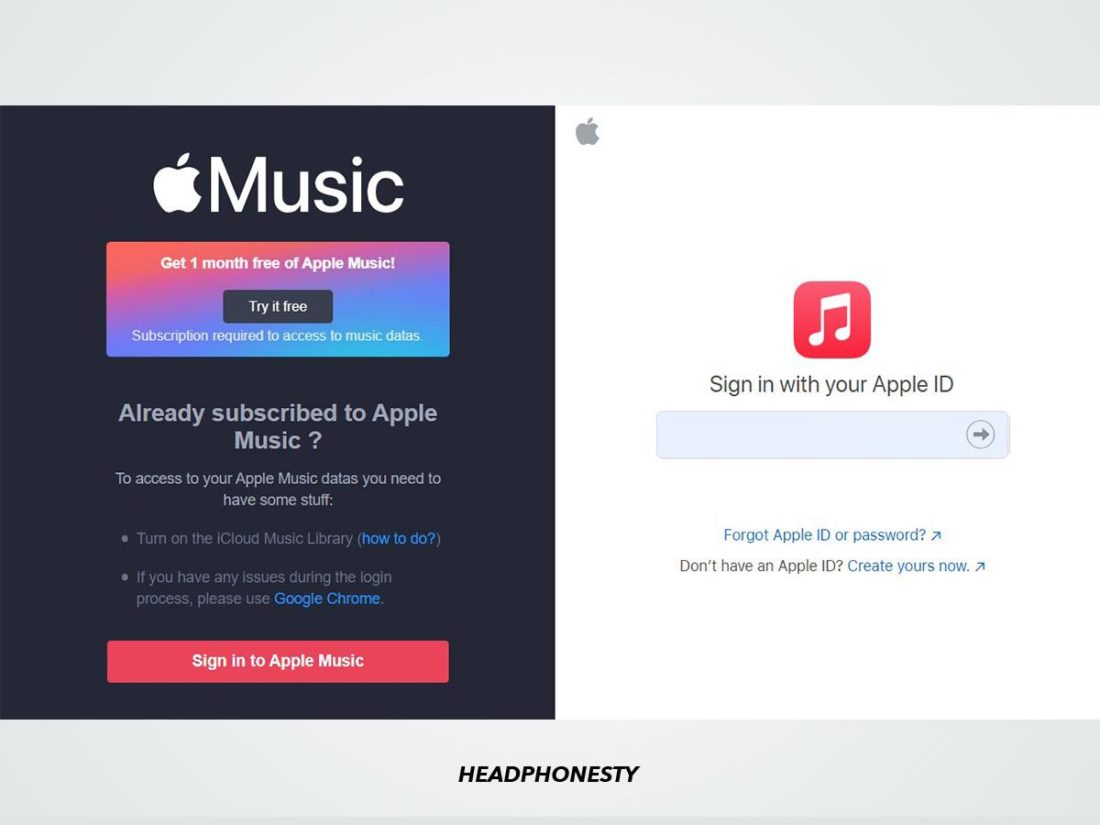
Connecting destination music streaming account to Soundiiz. - Click the ‘Sign in’ button and log in to your account.
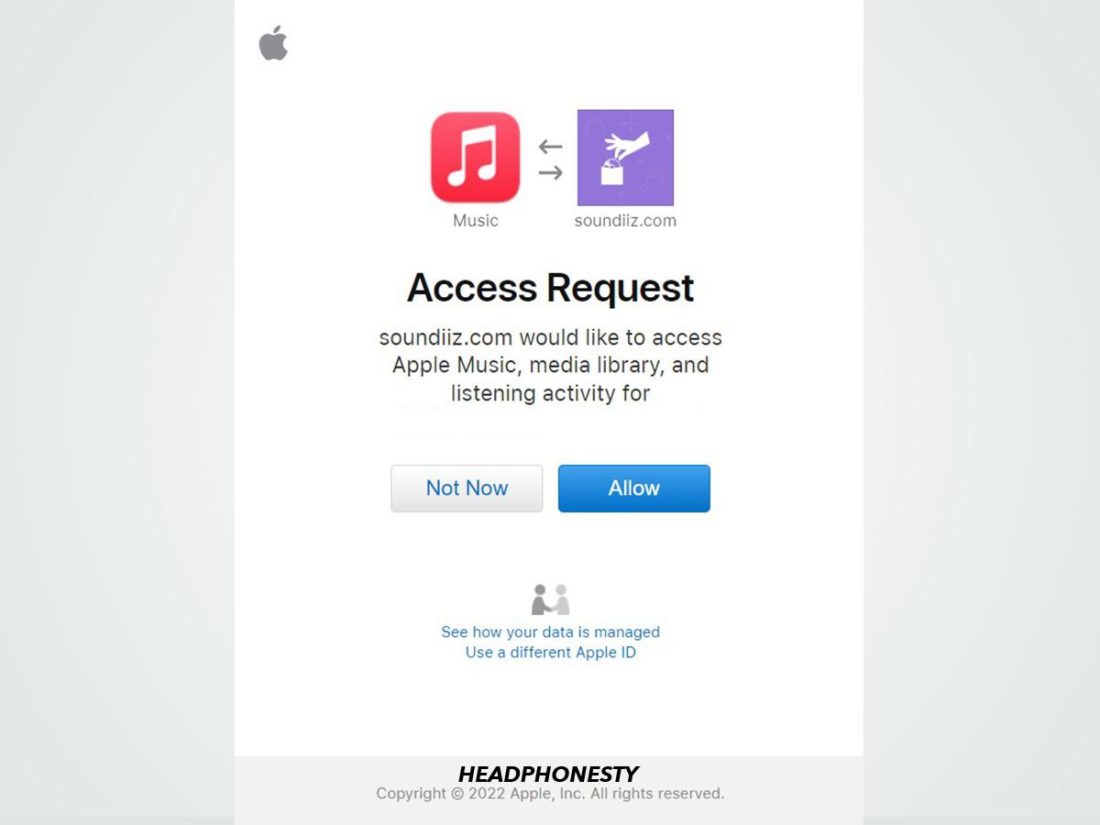
Signing into destination music streaming account. - Grant Soundiiz access to your account.
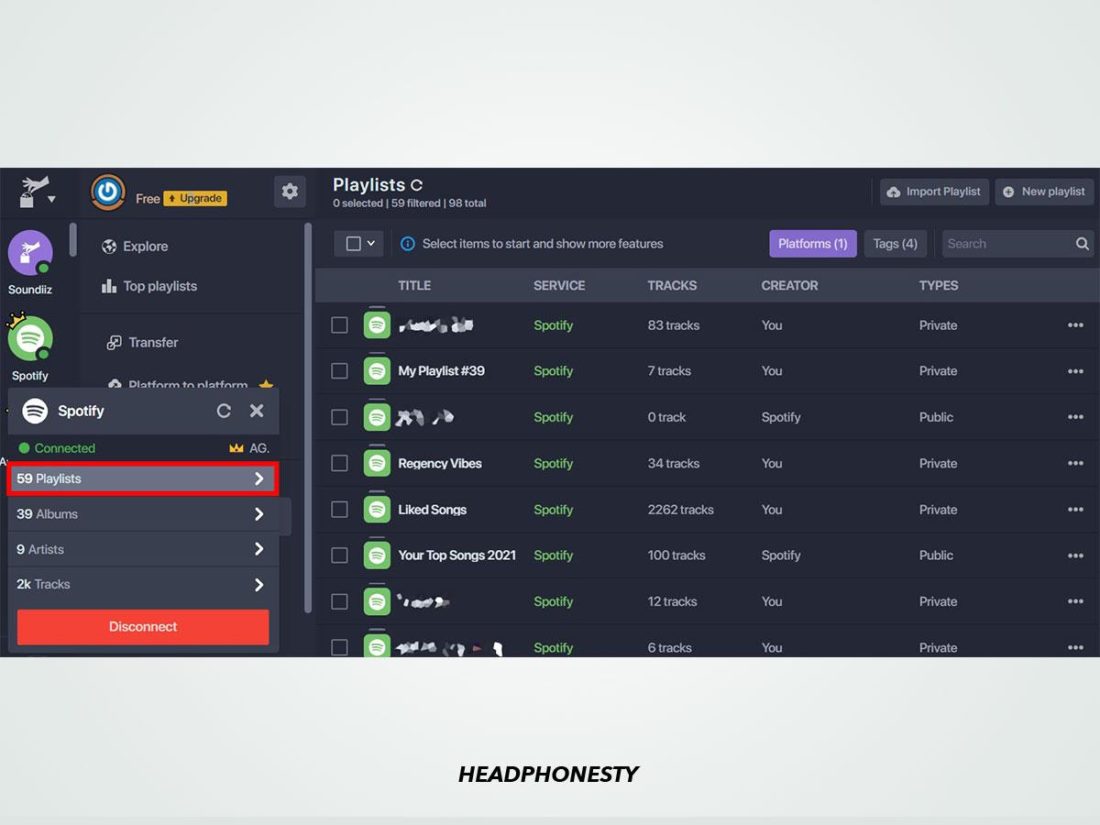
Granting Soundiiz access to destination music streaming account. - On the Soundiiz web app, click on the Spotify icon on the left sidebar and choose ‘Playlists.’
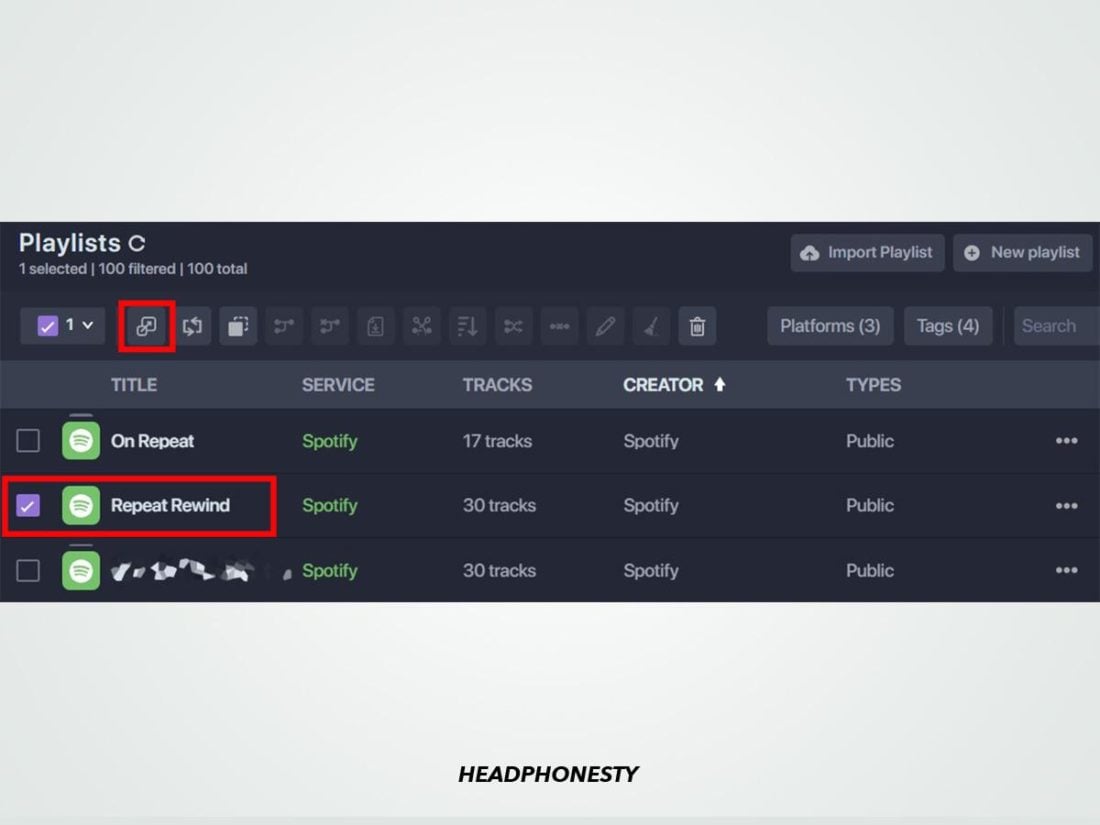
Accessing ‘Playlists’ on Soundiiz web app. - Check the box next to the playlist you want to transfer, then click the ‘Convert’ button.
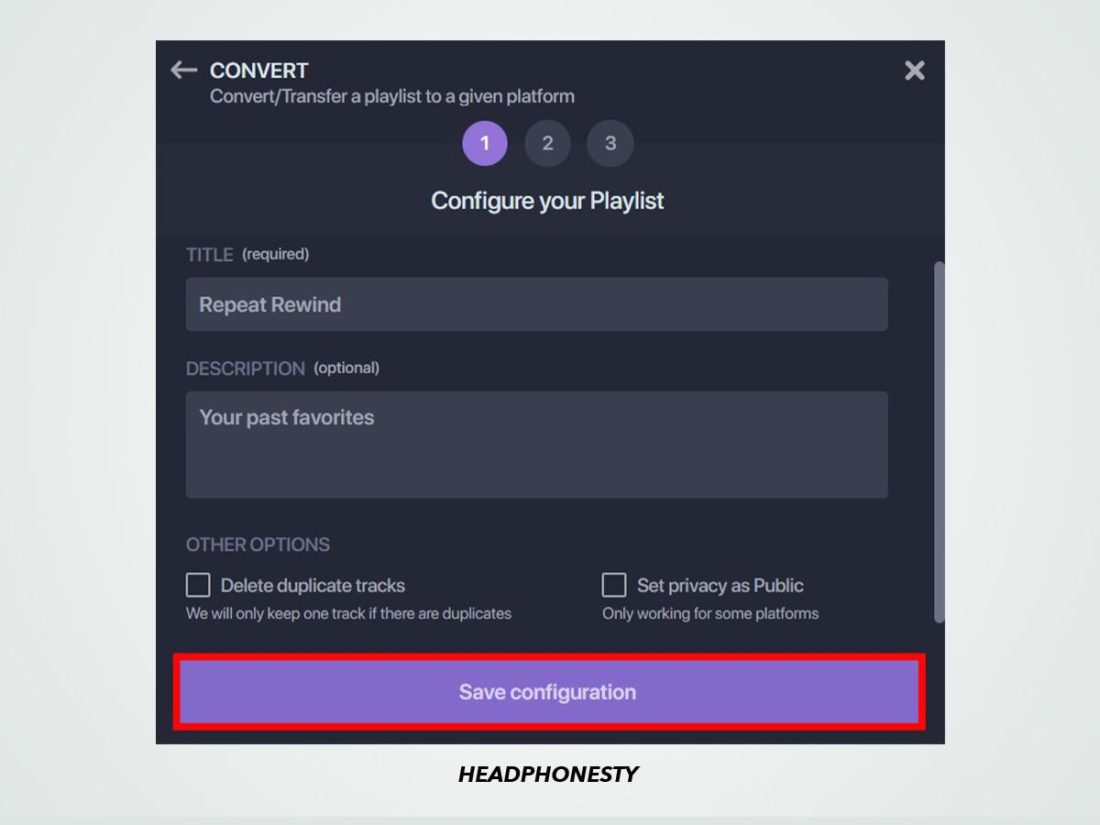
Selecting playlist for conversion on Soundiiz. - Configure your playlist title, description, and privacy settings, then click ‘Save configuration.’
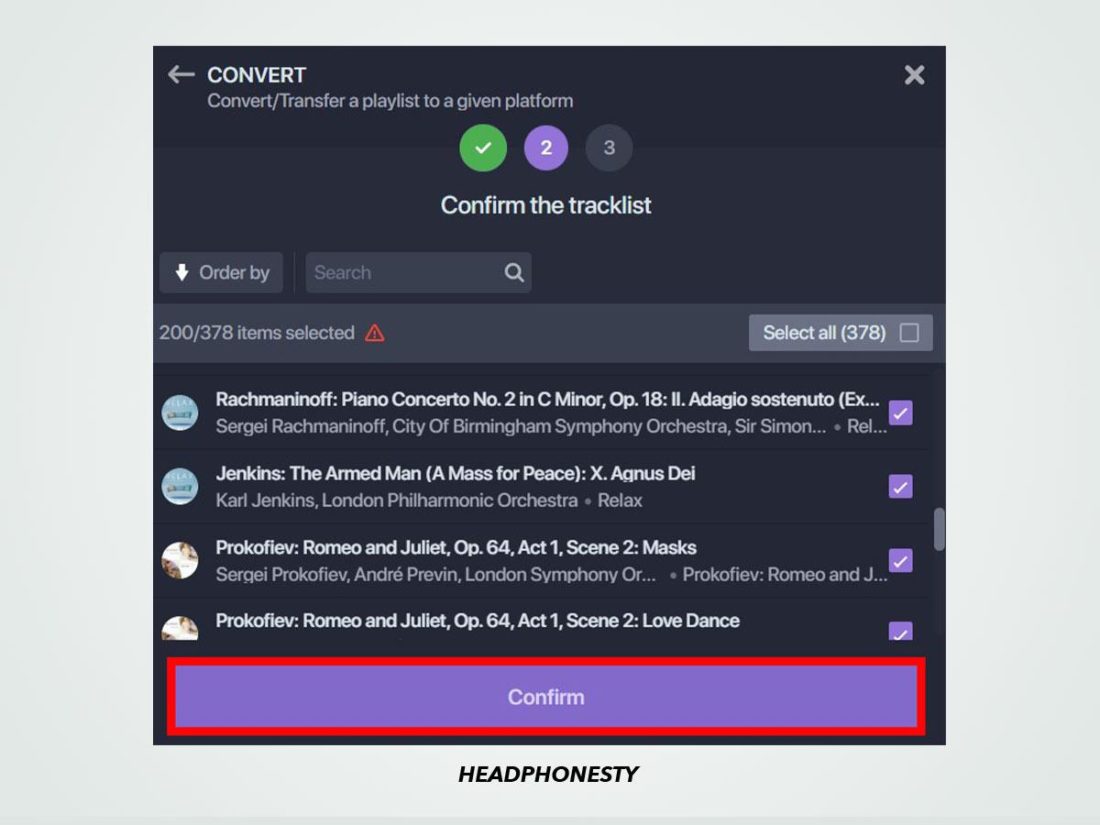
Configuring playlist settings on Soundiiz. - Select the tracks you want to include or exclude in the transfer, then select ‘Confirm.’
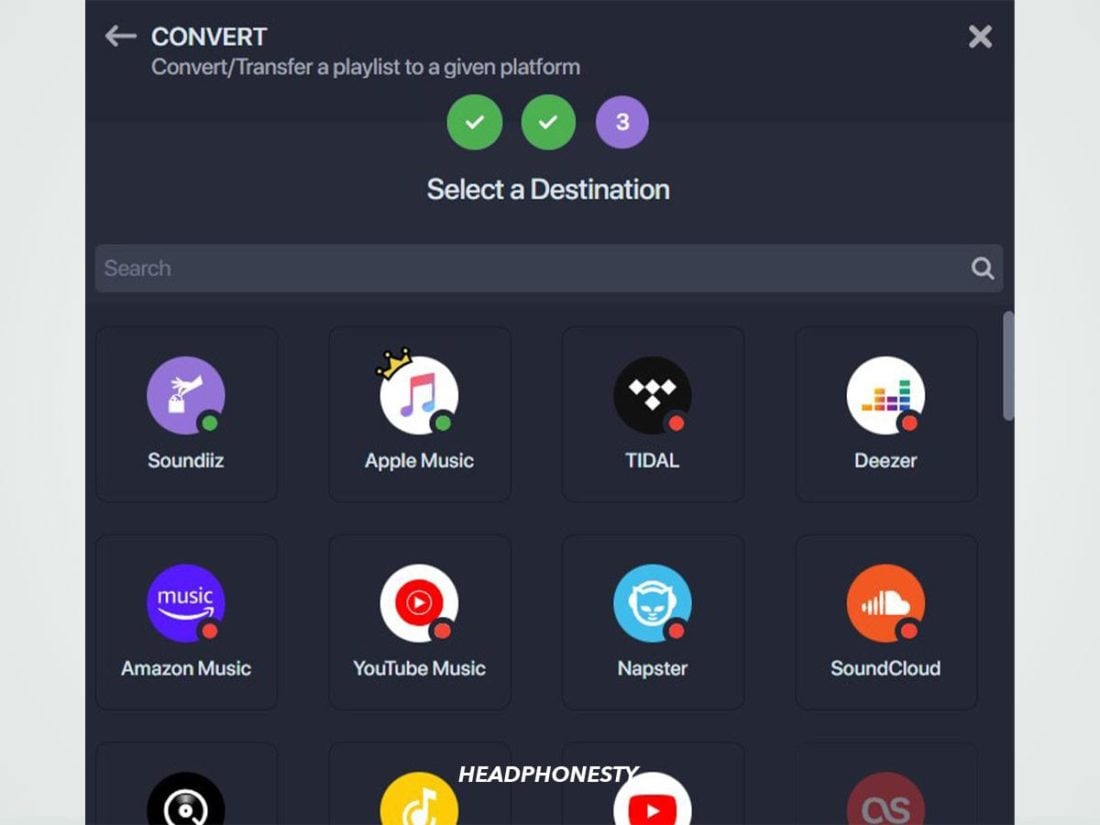
Selecting playlist tracks for conversion on Soundiiz. - Select the streaming platform you want to transfer the playlist to.
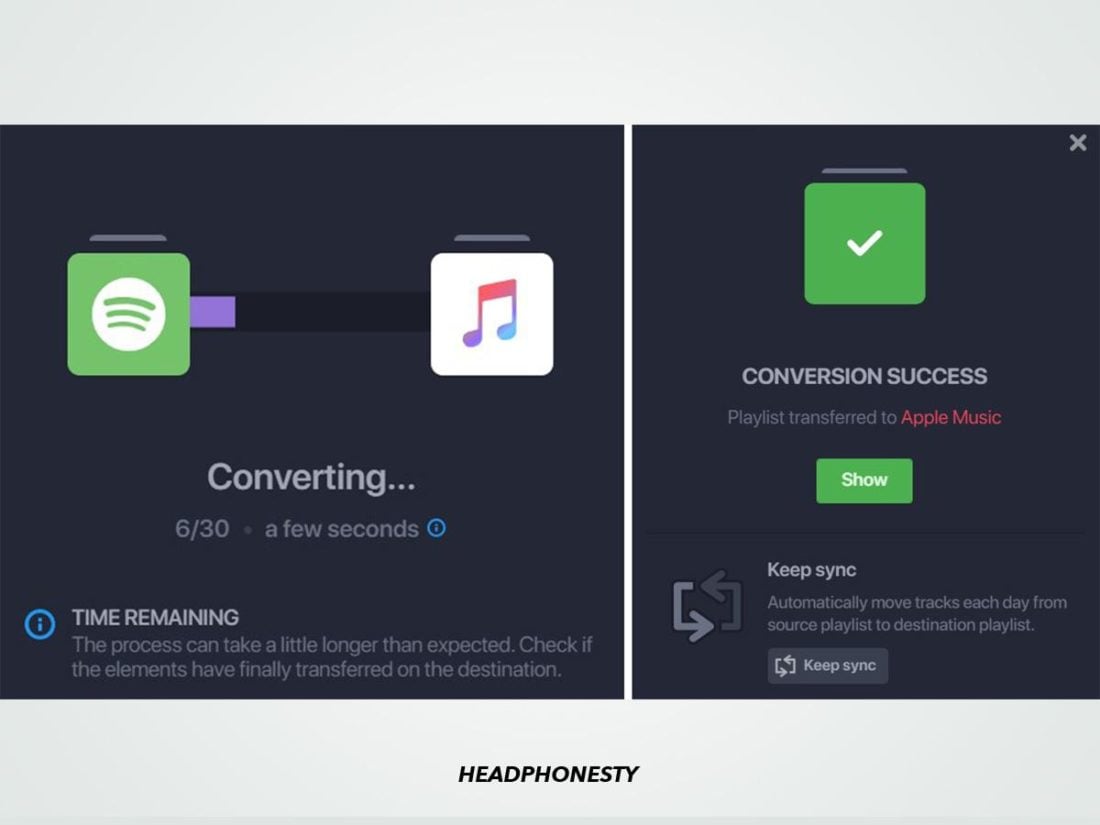
Selecting a destination music streaming platform for playlist transfer. - Wait for the conversion to finish. Afterward, you’ll receive a notification of a successful transfer.
Successful playlist conversion on Soundiiz.
The free version of Soundiiz lets you import playlist files, sync one playlist between two streaming platforms, and transfer as many playlists as you want, provided that you do it one at a time. Each playlist must also only contain 200 tracks or less.
Conclusion
Spotify is one of the most sought-after music streaming services on the planet, despite all the surrounding controversies and users turning their backs on it.
Whatever your reason is for leaving Spotify, if you too no longer want to associate with the platform, you can at least do so with confidence now.
Hopefully, with the guide we’ve shared in this article, you’ll have learned hassle-free ways to delete your Spotify account the right way, while still retaining your playlists! You’ll also be able to focus on the more important stuff, such as choosing a music streaming service with features (and business practices) that better suit your preferences.
Did you try any of the tips we’ve shared here to delete your Spotify account? And have you recently switched to a new music streaming service? How did you go about it, and did you use other apps besides those listed above? We’d love to hear your experiences, so drop us a comment!